Showing posts with label The Male Room. Show all posts

02 September 2026

Dots & Stripes TMR Challenge

 Hello everyone, my card today is for 
The Male Room 
 
I knew I had this stamp, and have never used it, so thought this was an opportunity to use it. I decided bright was my plan, I have yellow paper, I bought for a project and lots left over, a good time to use it. 
 
I stamped randomly in a sort of pattern, in different colours. Then horizontally, with a dots stamp and then again with the original stamp. With no plan as always, I went looking for a sentiment and luckily found this stamp, it suited my plan of bright. It was stamped onto white card. I then die cut a button, adding it to the stamped, and label cut sentiment. Next I die cut some candles, same as the button, out of gold mirror card. 
 
The background was added to blue mirror card, and added to the base card, next the candles and sentiment were added. For a randomly stamped card, I think it ended up bright as intended.  
stamps - Stamp Addicts, Vicky's Borders 
sentiment - Sissix, Catherine Pooler 
button die - years old! can't remember the makers
candles & label die - Magazine freebie SCP (old) 
inks - Distress Oxide, mustard seed,twisted citron,mermaid lagoon,spiced marmalade
gold and blue mirror card - The Range 
 
 
There’s great inspiration for your Male cards at the Challenge

05 August 2026

Jobs or Professions TMR

Hi Everyone, my DT card today is for  

https://themaleroomchallengeblog.blogspot.com/

My GNephew is a newly qualified Pharmacist and has just got his first real job in a GP Practice, he is so excited. He has worked in a Pharmacy since he is 16, off and on, between school and University, for experience, we are so proud of him. I decided to send him this card to congratulate him on his achievement.

I chose this image as it seemed just right for his job, then went searching for a background, pharmacy related, I found this on the web and think with the quirky image it suits. 

I took the image into Silhouette and print and cut it with a 1mm border twice. I also cut the background and the sentiments, after finding the font for the pharmacist word.

Next I coloured him in colours to match the background. My colouring could have been better. Anyway, after colouring and adding 3D gloss to the specs, I added the background layer onto navy card, then onto the card base.

Then I added the image with 3D pads and placed the sentiment and the pharmacist word, which I placed with 3D pads. 

image -  Dr Digi, Prof Dummkopf
inks - Distress inks, evergreen bough,antique linen,dried marigold,tattered lace,
walnut stain,wilted violet,picked raspberry,lost shadow,black soot,chipped sapphire
backgound - freefunart apothecary Pixabay
pharmarcy font -  ChesterfieldAntD
3d Gloss - Glossy Accents 
navy card - stash 
 
What jobs/profession can you do for the The Male Room Challenge

01 July 2026

Running Man TMR Hobbies

 Hi Everyone, my DT post today is for 
What a wide subject ay? My card is for running. So many of the family love running for miles and hubby's great nephew is a marathon runner, definitely a huge hobby for him, after his teacher work. So I brought an image out of the dark and made this for him.
 
My mind is certainly in slow motion, so I decided to use a sketch for help, but turned it upside down. I chose this one from the Outlawz, from June 2022, but the file name is Nov.27?  
I went looking for digi papers, and found these, I picked them to make the sketch and colours, no Idea why I chose these colours? 
 
Anyhow, I print and cut them out, and inked around the edge of each with black ink. They were then attached to the base paper, as per the sketch and placed onto the base card.  The runner was printed out and was die cut, then coloured with DI's to match the papers, I decided to colour just him and leave the background as is. 
 
He was placed onto the layered papers with 3D pads and so was the button. I stamped the sneakers and coloured them with the same colours as the runner. It all sounds so simple, but I spent an absolute age on this card. I hope the nephew likes it. 
 
sketch - Outlawz 
Runner image - Create with TLC
inks - Distress Inks
background paper & arrow paper - KimB Designs at Digital Press
foreground paper and stripe strip - luv ewe designs at Gingerscraps
 button - yayeah kit, Two Peas In A Bucket
die - Nested Rectangles Card Making Magic 
sneakers stamp - Magazine Freebie (old) SCP
 
 
What Male hobbies have the men around you got?
Why not enter them into TMR Challenge,
  don't forget to add the badge, it's a requirement our winners and honourable mentions.

03 June 2026

Charcoal Chuck TMR

 Hi Everyone, my DT card for today is for 


So many things I could have done with the subject, but it seems I'm on a run with a Dr Digi images. I love this image and as my Nephew in Law, is a great BBQ King it was made for him, he really does delicious things with the BBQ, so it's perfect for his birthday. 

I started with the background, pretty simple, I stencilled the clouds and grass and cut to size with a die. I then took the image into Silhouette and print and cut him 3 times for depth.  Next was to colour him with DI's. I really am no artist. The stencilled layer was added to the base card and then Chuck was added. I also print and cut the sentiment 3 times, it was a copy of the words I had in my files, that wouldn't fit, and it was layered onto the card. Quite simple, but that's my mind set atm. 

image - Dr Digi, Charcoal Chuck
inks - Distress Inks
Silhouette
stencil - Funky Fossil
die - Sue Wilson Noble square
sentiment copy words - Lettering Delights 
font -  Almond Slices
 
 
What is your outdoor subject?  See you at The Male Room
 
I was thrilled to be Card of the Week at Dr Digi. 

26 May 2026

Food or Drink TMR

Hi Everyone, my DT post today a second card for
 
Food or Drink, now that is a great challenge for me, but I have managed to do two for the challenge this month, I couldn't decide which to do, so did both. Birthday cake is food, isn't it?  
After a lot of thinking, I looked through some sketches and decided on this simple sketch. 
Now for colours, for this I went through my digital papers and this spotty multicolour popped out, I made a banner shape and coloured it in light yellow and added the sentiment. I decided to make the green the main colour, no idea why! I hadn't used watercolour pencils in an age, so decided as the main features were quite small, I would use them. They were all taken into Silhouette and print and cut, the image twice with a 1mm border, as in a die. 
 
The sentiment banner was edged with a DI, so was the spotty paper. They were added to the card. I then decided to add 3D glaze to the image as it looked dull. Then thought to add some stars to make it more celebratory, to which I also added 3D glaze. Card done. Shame you can't see the shine with the glaze.
 
 digital stamp - Dr Digi, Connie Confectionery 
inks - watercolour pencils, Reeves - Distress Ink, twisted citron 
paper -  Just So Scrappy, School Rules paper #3 2011
3D glaze - Nuvo Crystal Glaze
Silhouette
star dies - CraftAddictions UK 
font - The Blue Cabin 
 

What will your Food or Drink be for the Challenge?

06 May 2026

Food or Drink, Burgers TMR

 Hi Everyone, my DT post today is for

 
Food or Drink, now that is a great challenge for me, as I don't have many food or drink stamps. I saw this digi for sale and just had to get it. With the GNephews being adults now, I thought they would appreciate it. I hope. 
 
I took it into Silhouette and print and cut it 3 times, then coloured it with DI's using a lot of colours. The sentiment was printed and fussy cut, maybe I should have had Silhouette do it, anyway, I then had to do a background. After looking through backgrounds in my files, I found this beauty, just perfect for Bob and his dog, even the shadows fitted it. I find digital scrapbook kits are very handy with their different papers and elements.
 
Next I layered all the images, then added the background to the base card and the layers onto it. The sentiment was added with 3D pads.  For all the colouring, it really didn't take that much time, I'm glad to say. It's a big image on a 5x7 card, and my colouring isn't brilliant, but I quite like it. 
 
image - Dr Digi, Bob's Big Burger
inks - Distress inks, too many to say
white pen - Posca
background - Afternoon-Delight/Dezines by Nae at Digital Scrapbool.com 2020
 
 What will your Food or Drink be for the Challenge?

01 April 2026

Vehicles Or Transport TMR

Hi Everyone my second DT card today is for

 The Male Room

 Still without mojo, when will it return? I have too many family cards to get made, it's going to be hard at this rate. I had already die cut a car, but it didn't go anywhere, even after a few attempts!  So off to my files again and found this image. My brother sent it to me many years ago, so I don't know where the original came from, I was under the impression, he added the ivy etc to an old car in Photoshop, but I may be wrong. He used to be a photographer, so very experienced.

Anyhow, I took it and added it to a scalloped half, in Silhouette, found some quotes to suit the men whose birthdays were in March. The scalloped image, and the background with a quote, were print and cut, then added to the base card, the scalloped shape was 3D'd onto the card. I used a landscaped 5 x 7. Next I found some gears and cut them out in Silhouette with rose mirror card to match the rust of the car. Then they were added.

I was happy to have 2 cards with one sitting. 

image - unknown 
scallop circle -  Digichick, Scraporchard
gears - The Free SVG blog 2017 
quotes from the web 


 What will your mode of transport be?

04 March 2026

Blue & Brown TMR

 My DT card today is for 

 
I'm struggling with mojo, so I'm using my Silhouette, sketches and casing some cards to get me through this complete blockage. I had pieces of brown card on my desk from my previous post and then realised the colours were what I wanted for this post. How handy was that? I went looking for more of the brown card and I didn't have any! Just little pieces that were far too small. I had to order more, who runs out of brown card? 
 
Anyhow, I had already chosen this treasure box to make. I then I picked a different paper for the blue, I decided on pearlised, so that I could stamp the greeting on it. 
 
I cut the base box with my Silhouette, and after glueing it all together. It was fiddly, as I had reduced the size of the box to fit the gift I was using it for, it's still 85mm x 80mm (31/4 inch x 3inch). I tried to keep the paper pieces together, also cut with Silhouette, whilst stamping, again a little fiddly, but they were done and added piece by piece to the box. I then used dies for the fastener, with an anchor cut with Silhouette, and a little velcro to close it. I'm quite pleased how it turned out. Although the quality of the stamping could have been better! My apologies.  
Treasure Trinket Box - Dreaming Tree. 
card - Florence Cardstock 216gsm Amazon
blue pearlised paper - Bumaga (years old) 
stamp - Stamp Addicts
dies -  Tonic
anchor - Jessica Dunn "Coastal Spring element" at Digital Scapbook.com
 Silhouette 
 

07 January 2026

Add a Tag TMR

 My DT card today is for 


It is my #3 brother's 86th birthday, so I made this card for him. I die cut the man 3 times and layered him, then looked for some paper. I found this striped paper, and embossed it with a happy birthday embossing folding, then layered onto a striped grey paper, and added to the base layer. The words, I didn't think, stood out enough so I rubbed an ink pad over them. 

The die cut man was added onto a line within the ef words. The tag was printed and cut with the Silhouette and layered 3 times, I then inked the edge. I added a safety pin, also cut out with my Silhouette. Then attached to the front of the card.  I hope my brother likes it.

man die - Amazon
paper - B&W Collection, Craft Sensations
embossing folder - Etsy
ink - Distress Ink, hickory smoke 
tag fonts - Bigger lemons thin & Daddy
Silhouette  


03 December 2025

Christmas Colours TMR

 My DT card today is for 

Mojo was definitely on holiday, with things as they were for me at the time of making this month's cards, all before hubby's passing, so red and green, an idea, red background and green trees, simple yes? 

Except I went around in circles with what I wanted to do, then decided CAS. I went into my Silhouette and cut the Noel from the red card. I couldn't find a Christmas embossing folder I liked for this, so used an argyle folder I have had for years. It is a masculine design, after all. 

I had numerous trees I could have used, but decided on these. I cut them out in white and then looking for something else I found the holographic card, so cut the snow details again. They were added to the trees. I decided to cut a piece for under the Noel too, it added extra sparkle. All of them were added to the red card and all attached to the base card.

I then added a cut star, that I had coloured with gold ink, and decided to splatter the same gold ink onto the red card. 

I hope your red and green card comes together easily. See you at the Challenge.

red and green card - Lidl
trees -  Snowy Pine Trees by Sarah Bailey ID #234547 Silhouette Design Store
holographic card -  B&M 
embossing folder - Argyle Embossing folder Embossalicious Die'sire
gold ink - Kuretake Starry Colors 
 

05 November 2025

TMR Floral

 Hi Everyone, my DT post for today is for 

 The Male Room Challenge

After looking through my Christmas stamps, I decided to use the Christmas Roses and the oval leaves from the same set, stamped and embossed in gold. I then coloured both in DI's. The robin was found in my bits box, already coloured, and he was just what I wanted for this male card. Both sat on my desk for weeks, with me wondering how to use them. I found a sketch online that helped me place them, so off to my dies. I cut the oval and dry embossed it.  I added the same green as the leaves to wipe over the embossing. I flipped it and placed the oval to enable the flowers to show.
 The flowers were added with 3D pads onto the leaves, and they were then 3D'd onto the oval. The Robin also had 3D pads added and then placed onto the oval. I wasn't sure which sentiment to choose, but this popped out to me. It was stamped and embossed in gold. The flowers, leaves, and sentiment were then painted over with a gold shimmer pen. Next, I used gold paint to splatter onto the whole card. It's a lovely effect in real life.
 
flower and leaves stamps -  Chloe's Creative, magazine freebie SCP#262
 sentiment - Christmas Special magazine freebie 
robin - British Garden Birds magazine freebie SCP #287
embossed die - Tattered Lace
Oval die - Tonic
inks - Distress Inks 
gold shimmer pen - Nuvo Midas Touch 881
gold splatter paint - Kuretake Starry Colours

01 October 2025

Baby Boy TMR

 Hi Everyone, my DT card today is for 
 
I haven't made a baby card in a couple of years, and was thrilled to make one. I had a couple of stamps, but went to a colouring page by someone I have been a follower of for years. I just love her images, and I had a choice in my files, but decided to go with this cutie. Also, we have a local singer comedian named Max Boyce, and he got the crowds going by saying oggie oggie oggie. This image has a similar saying? So I had to go with it.
 
I print and cut the image with Silhouette on watercolour paper. Then coloured it with Distress Inks. I had a design in mind with a heart, but it didn't work out, so I print and cut a heart with the "oogie oogie" on it, again with Silhouette. I had this "It's a Boy" stamp for a long time, so stamped it onto the heart. Next, I layered the 2 layers of the baby and 3D'd it onto the heart. I used a die heart and sentiment and added it with a split pin, don't know when I used one of those last either.
 
I was going to leave it at that, but for some reason it didn't look right, I die cut some textured card, and ink blended it. Then embossed it with a background I had made with Silhouette an age ago. I cut 3 layers of the hearts and then glued them together. Next, I embossed the layers onto the inked background.  The colour isn't quite right in the photo, but near enough.
 
image - Elizabeth Dulemba  Baby Oogie
 inks - Distress Inks, tumbled glass, broken china, 
dried marigold, spiced marmalade
scalloped heart - Samantha Walker Scalloped Edge Shapes
 Masks Collection 2017 at Digital Scrapbook/Pixelscrapper
it's a boy stamp - Magazine freebie (old) 
heart and sentiment die - CraftAddictionsUK
 Wonky Hearts - Paige Evans, Silhouette Design Store 
square die - Sue Wilson Square Noble die 
 

03 September 2025

Create your own background TMR

 Hi Everyone, my card today is for

I had a card to make for our neighbour, so went looking through stamps and my digi stamps and found Ted. I've used him a couple of times, and cased one of my cards here, our neighbour loves his garden, it was for his 82nd birthday.

I took Fred into Silhouette and cut him 3 times, the background twice, in case I made an error, you know I hate fussy cutting!  I coloured the background in DI's, adding a few bushes in the garden, then some grass and sky. All layered onto a die cut circle. Ted was coloured, and the 3 layers glued together and added to the background.

digi stamp - Dr Digi, Ted & his shed
inks - Distress Inks
circle die - Tonic pin dot
hollyhock die -  AliExpress
sentiment - from the web  

02 July 2025

Dogs and/or Cats TMR

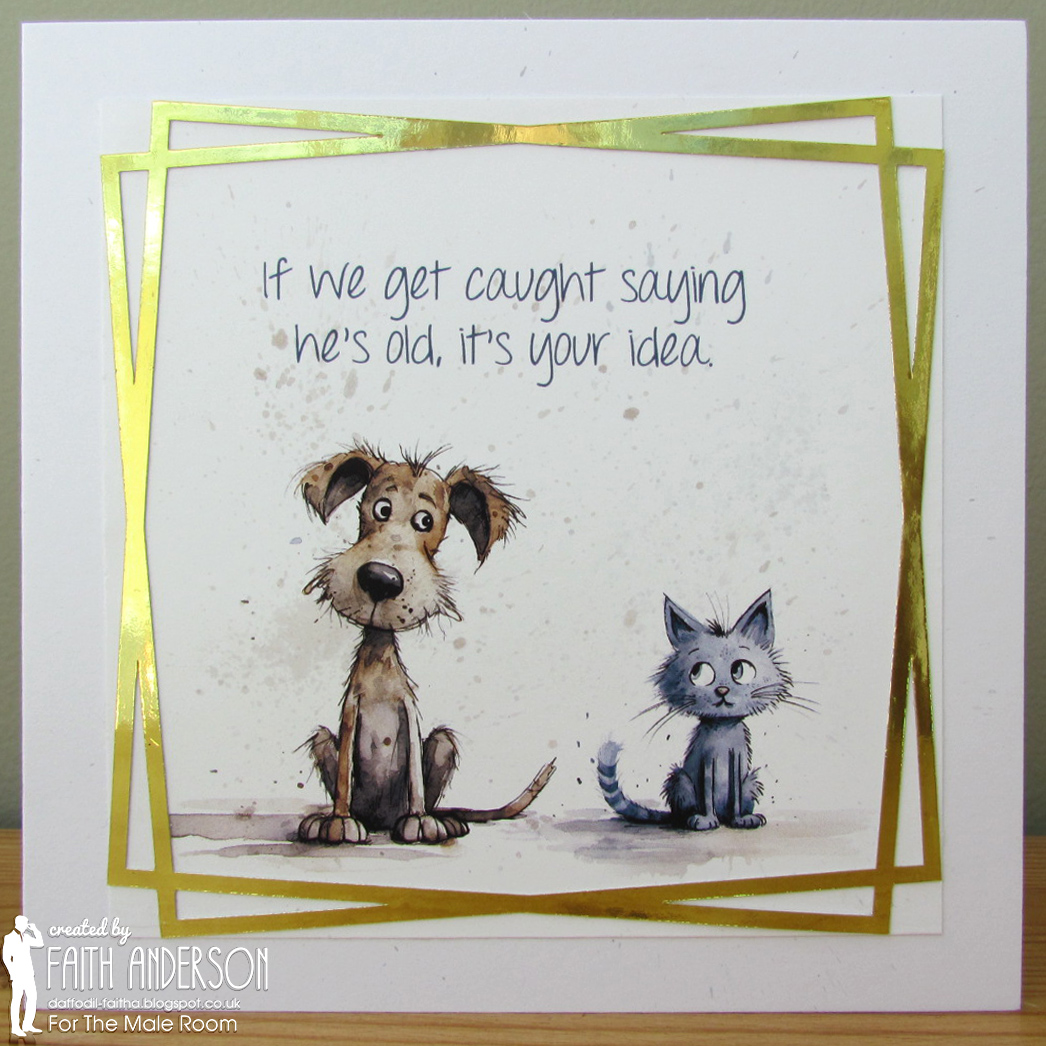
 Hi everyone, my DT card today is for 
 
I've only got digital images for cats or dogs, so that's what's used today. The images were edited in Photoshop, adding a sentiment, then printed and die cut it. Looking for cat images in my files, I found a shape I thought I could use. I tried cutting it with Silhouette, but it was too fine and didn't cut properly, so I made a shape similar, but with thicker lines, in the design area, and cut it out of gold mirror card.
 
I embossed the edge of the printed background then decided to add splots to the background, after seeing another blogger do the same, but now I don't know who it was, sorry. I used hickory smoke and faded jeans DO's mixed to match the images, shame they don't show up in the photo. I attached the image layer to the card and then the gold frame. 
cat & dog - Creative Fabrica
frame - my own design
sentiments - my own
inks - Distress Oxide, hickory smoke, faded jeans 
gold mirror card - The Range
 
I have a few nephews on the cusp of old in the next few months, so I made another. Much the same but with a different sentiment and cut to the frame to hide a cutting error. You can see the splats more on this second card.  
 
 
I hope you can join us in the challenge, and get your creative juices flowing for those difficult male cards. There are great ideas from the DT to view. 

04 June 2025

Fun Folds TMR

 Hi Everyone, my post today is for 

I can't believe I pondered so long in doing this card, only just making it for the challenge. With so many beautiful folds, I decided on this one. Then went on to do 4 others, 2 went into the bin, so I decided to show you the 2 I'm not too happy with, I could have done better work methinks.

My first card is a Double Z fold, a super card designed by my blog friend Shirley, I didn't do her justice on this card. The tools and sentiment with white card, and the grass with the green of the base card, were cut with my Silhouette, the background paper was cut to size and then stencilled with DO, and added to the green background. 

The tools, shelves, and sentiment were coloured with DI's, when dry, the shelves were added, and the tools placed onto them, held with the bracket piece. Then the ladder, the gloves, the grass layer with the sentiment were arranged.

double Z fold Card - Shirley's Cards 
stencil - Funky Fossil brick, coloured with Distress Oxide hickory smoke
ink - Distress Ink (lots)
card - white 300gsm Craft Card Hobbycraft 
green card - Lidl
Silhouette


My second was a template from Craftworld, a Z fold, which I transferred into Silhouette, I cut the shape, then folded it and added the printed shapes and the rabbit centre. I really don't know where my mind has been on these folds, with so many other shapes I could have done. I spent a long while looking on the web to be able to do something different, it just didn't happen - sorry.

images - Creative Fabrika

Go see what the DT have done, they are amazing.
  Great ideas for the men in your life. 

05 March 2025

Happy & Bright TMR

Hi Everyone, my DT card today is for 
https://themaleroomchallengeblog.blogspot.com/
I was stumped big time with the mixed media, but after looking online for ideas, I came to the conclusion that it was just using different things to make a card. Please correct me if I am wrong.

I had a few male birthdays, well 7, out of a total of 11 birthdays in March. I decided to do 2 similar, but, I didn't know where to start. Going through the many paper pads I have, I found bright papers, suitable for the male species. These were die cut for a landscape 5 x 7inch card.

Then my Silhouette came out to cut this layered happy birthday, in matching colours for each paper. Starting with the light blue background, then the black layer, the purple Happy was next, then the black and green for the birthday. I coloured all the additional letters cut in white card, for layering, in colours to match the papers. 
 
The Happy letter cut out, was used as a "stencil" to add a glass bead paste layer onto the Happy letters. The birthday letters were covered in 3D glaze, after I had attached them to the birthday layer. Just one thing, t looks like the B and the R are both red, nope, the B is red, the R is orange. It must be the light.

I then stamped a sentiment and die cut it, adding it to the finished card.
my mixed media, contains
die cut, stamping, stencil, glazing
 
paper -  Craft Sensations 
Happy Birthday - My Scrap Chick
die - Card Making Magic 5 x 7 Card & box set
Silhouette Cameo 2
layered card & paper - Lidl
white card - Crafters Companion
glass beads paste - Winsor & Newton
3D glaze - Nuvo Crystal glaze
birthday stamp & die - Julie Hickey Birthday Sentiment stamp set

I love the bead effect, I saw it originally on a Christmas tree on Loll's blog here. Not the same brand, though, hers looks finer and more even.


05 February 2025

Monochrome TMR

 Hi Everyone my DT card today is for

The Male Room

I started off thinking of black and white, but I had just seen a card, looking through my photos for inspiration, again, where is mojo? I saw Mr Fix It. Off to Photoshop I go and design the background, I printed the background, and a plain colour mat, then the image.

I had added a line around the image and fussy cut on it, the image was then coloured with markers. The patterned background was added to the plain coloured background and attached to the base layer. The image layer was added with 3D pads. A different take on monochrome, that I quite like, I hope you do too. Thank goodness for records of cards, that I can case.

image - Mo Manning Mr Fix It 
pattern paper - Melo Vrijhof, TriangleBig, Digital Scrapbook.com 2015
font - Boller Typeface
markers - Spectrum Noir

06 November 2024

Flip ear dog TMR

 Hi Everyone, my DT card today is for -

OH! My goodness I did procraftinate about this card, I had a few ideas, even made 2 and threw them, one of them I spent ages measuring then put it together and what a mess. So this was my best effort. I’m really not good at measuring and making, I usually have one or other pieces not fit together, so it was off to my Silhouette and download a file to enable me to get it right. I then inked each piece. He makes me laugh and took some putting together. I 3D'd his nose and I chose the same colours as the designer,  I'm sure I will try other colours next time. He’s fun, and I'm sure one of the Great Great Nephews will love pulling his tongue out to get his ears to pop up.

 Flip Ears dog design - Lori Whitlock
all card - Lidl
inks - Distress inks, ground espresso, tea dye, festive berries, candied apple
Silhouette cut file
 

with his tongue pulled out, his ears pop up


02 October 2024

Trees TMR

 My DT card today is for

I have a number of images and stamps for Trees, but I went with an embossing folder instead. I embossed it then coloured it with water coloured pencils, I couldn't trust myself with anything else! I added water to a brush, to spread them out, I used different gold inks to colour the decorations. Then I stamped a couple of corners in gold embossing ink to the top of the card to balance it out, I thought.  

 Next I stamped and gold embossed a sentiment on vellum and added it to the tree base. They were then layered onto gold mirror card. The card was slightly short, so I added die cut presents with the white card, overlaying gold mirror card to make the border even. The photo is a little darker than normal, due to me wanting you to see the stamped corners. Although they still don't show as in real life.

pencils - Nuvo Vibrant Watercolour Pencils
Christmas tree EF & dies & stamp - Magazine freebie Simply Cards & Papercraft #209 
gold pigment inks - Kuretake Starry Colours
gold embossing ink - Hobbycraft
vellum - Crafters Companion
gold mirror card - The Range