24 July 2021

Leopard Girl

 Hi Everyone just a quick post. As I loved this image and as she is a freebie I thought you may want to have a peek at her yourselves. I'll be making something from her soon, getting my head in gear atm. Lots going on here.

https://www.creativefabrica.com/product/girl-planner-clipart-leopard-print/ref/1229291/


SO many free fonts or for a $1
Discount Deals

Hope to be back to normal in at least a couple of days.


Hope all OK with you all


Affiliate post (it means if you click on a link I may get commission).


21 July 2021

Table Napkin card

 Hi Everyone an old technique today, but still interesting and great to do.

This is the first card I showed the class. I had bought some table napkins as I loved them. I showed them how to strip them to the one layer and glue the layer to a card, layer it again onto a background card and add a sentiment. They didn't make it, it was just something to let them know they could achieve something easy. They were interested thankfully.

You all know how to do it, so I will just let you know how I did it - pull apart the three layers of the napkin gently, glue the top layer to a piece of card, then layer onto the background layer card and attach it to the main card, add a sentiment - card done. 

It's something I think they can do, so I will try them with it at a later stage, maybe with Christmas table napkins? 

table napkin - Tesco 
black card - stash
sentiment - Cut & Make, The Range
gems - stash

Affiliate links if you click on the link I may get commission.


19 July 2021

Floral Music

Hi Everyone, I hope you UK ladies are not melting in the heat, nothing compared to some other countries, but sooo hot for us. This afternoon it is 30C 86F. I've escaped to my North facing craft room and although still hot, it's not as bad as outside.

Anyhow, the stamping I did today was actually done months ago, but it has been screaming at me to use it for a long while, today I plucked up the courage and found paper that actually matched the colours I used. I also found a sketch I could use, as the paper was die cut to the inch of it's life, now just more tiny pieces left. A few sequins to finish off.

A simple quick card today, just the stamping 3D'd, the bottom paper layers added to the card and a die cut sentiment. One of the 24pence dies I got in a sale recently.

stamped image - Chocolate Baroque
paper - Craft Sensations
die - Cut & Make, The Range
sequins - stash
the sketch, not colours of course - #390 CAS Colours & Sketches

Hope you're all keeping cool and sane!

Chocolate Baroque Beautiful Blooms


Affiliate links if you click on the link I may get commission.

Great free classes on everything here. 

Creative Fabrica

17 July 2021

Pineapple

  *Disclosure: 

This post contains affiliate links to Creative Fabrica.
that at no additional cost to you, if you use these links or buy something.
 I may earn a small commission.  I only recommend products I would use myself.
 Read full privacy policy Here

Hi Everyone, I thought I would show you another card I did for the craft club ladies. I bought the Pineapple die for 24 pence in a sale. A great little die and that's how the card started. I cut it out of white card and coloured with marker pens, then cut the shapes in orange and green to back it. I glued the bottom half onto orange card and the top onto green and cut it around the pineapple. Some clear sparkle and it was just about done.

I had a cut file of specs, so cut 6 of them with the Silhouette and glazed the lens part. 

I used some pineapple paper from my files and cut it into 6, then cut 6 out of orange card to layer the paper. I made a banner shape and added the sentiment in Photoshop, I took the shape and sentiment to my Silhouette and cut 6 out, then cut 6 shadow layers. 

The ladies will glue and put all the paper layers together and die cut and colour the pineapple and add the sunglasses if they want. I hope this is a good way for them. We'll see, I'll let you know how it went.

Pineapple die - Dovecraft
sentiment - Create with TLC Creations
orange card - B&M


I also designed a card in Photoshop, printed it and the ladies can cut it out and decoupage.
 I kept it quite simple for them. This is it.

paper and cupcakes - Watercolor Clipart Dessert Cake 


this is the full layout, you are more than welcome to use it for yourself. 
If you do use it I would love to see what you did.
it's sized to an A4 and will make a 6 x 6 card, 
just copy and add to a landscape A4 size in any program you have.
 I hope it works for you.


There is a fabulous Christmas sale on for July, 
with lots of freebies and half price sale, follow this link to find out more

You can buy this subscription with a special offer on this page:
Instead of paying $29 per month, you will get the subscription plan 
for $1 for the first month and $19 for any renewals. 


EDIT - The class was Wednesday, I was watching the weather forecast in the night and I said to Hubby, they haven't shown Wednesday's weather, rewind to see it. He said it's Wednesday today! I had missed the class! I rang the lady and she said, I'm so glad I'm not the only one who does that. I felt so very bad. However she said only 3 were there and one of them is a digital card maker, print and fussy cut and add layers. So they were Ok.

Well I have lots for next week and the week after now.
Keep sane everyone, seems like I'm losing it!


15 July 2021

Hello over the fence!

  Hi Everyone before I start on my DT card, I have to thank you lovely ladies for the help and advice about my tutorials you have freely given, I appreciate it so much. It was too late to change my plans, so will let you know what happened in another post.

I am here with my DT card for today, it's for the challenge at QKR. Our challenge is on the 1st and 15th of every month, so you have 2 chances every month to enter the challenge.

We will select two winners each of the weeks 
1 using QKR Stampede  or Eureka Stamps image
 and 1 using any image!

Anything Goes every 1st & 15th of the month

This happy dog is saying hello and I thought he deserved to be surrounded by flowers. I have to admit to casing a card when I saw the sketch challenge at MFT and a card by Melania Deasy. I'm not good at "splattering" and had a dp that I used instead, works a treat methinks😀

I coloured the background paper strip in Mustard Seed Oxide and layered it onto blue card. The image was first print and cut on my Silhouette, I know can't leave it alone at the moment. 😄 Then painted with DI's and his nose and eyes were glazed, a flower die was added with gold drops on them, these were then placed onto the background. I stamped the sentiment and heat embossed, I cut the grass out of white card and used Oxides to colour it, added it to the last piece. All were  placed onto the dp and blue card then added to the ready scored card. It's a shame you can't see his shiny nose and eyes and the embossing. 

The photo is a little dark, as I didn't use my light box and too late to change it! Silly me. 
sketch - MFT 547
image - Hello QKR Stampede
inks - Distress Inks / Oxide
hello stamp - magazine freebie
flower dies - Tattered Lace
grass shape - Alaa'K Silhouette Store
dp - Fanette Designs
glaze - Nuvo
gold drops - Nuvo Crystal Drops


13 July 2021

Tea Cup card and classes. Help please?

 Hi Everyone, the saga of my makes last and this week continue.  I have been persuaded to help out in a new craft club for mentally challenged people, with a view to opening to others. I had shown them one card which was well received.

 The trouble is I have never taught crafting and don't consider myself knowledgeable enough to teach it, however, I felt better when I showed them a punch from the stash that had been donated and they didn't know what it was or how it worked and were astonished, yep! that's the correct word, to see how it worked. 

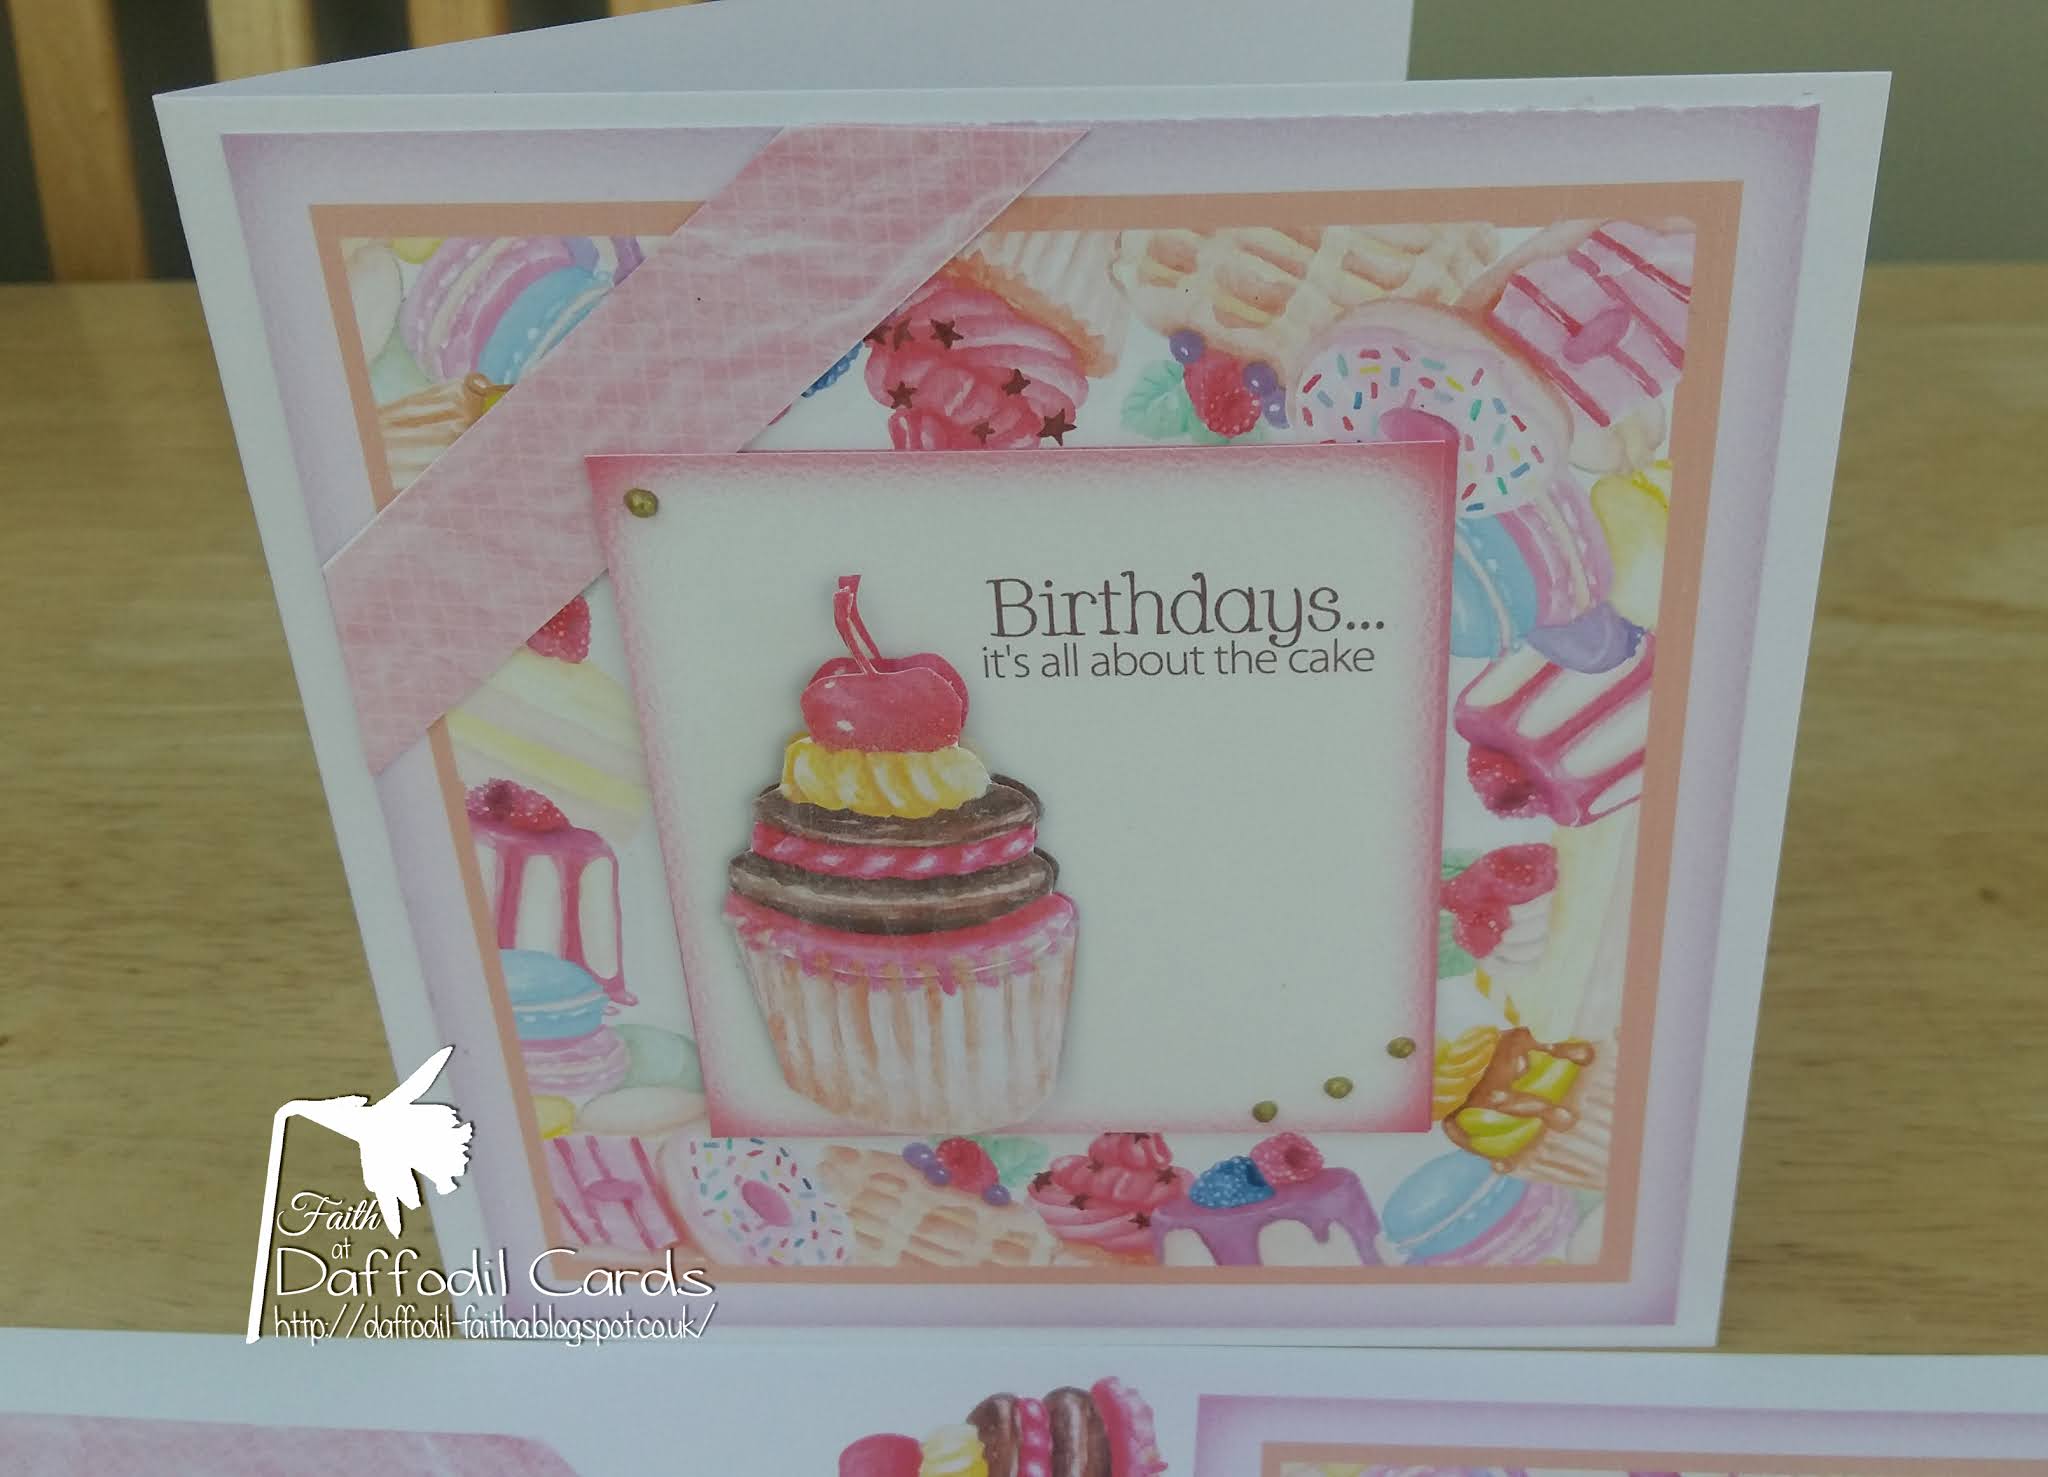
Anyhow, I decided although we haven't got 10 people yet, I looked for an easy card, but different and yes! I went into the Silhouette again. I'm getting boring aren't I? but this file was so simple and looked quite difficult that I went for it, but after nearly 2 days of cutting (not continuous), I began to think I had chosen the wrong card! So many pieces!

Here it is, all 10 copies were done, bagged and even with ribbon that I measured so all were the same. I believe this is the way classes are prepared, OK! maybe not this way, but I thought I would try it. I've only been to one Zoom class where pieces were prepared for us, so got the idea from that. Otherwise I am winging it!

Both cards
card design - SVG Cuts Tea Cup Box Card
floral paper - Craft Sensations
ribbon stash
sentiment and back cup piece was printed and cut
tag was stamped with a magazine freebie

These are the pieces for one card.


This is the card I made as an example for them to see what they could achieve.
I promise you, it really is VERY easy.

cup and envelope, 
sorry it's blurred, but I wanted to show the envelope pattern in the stripes.


a better photo of cup and envelope

this is the sentiment, it's written with a pen in the Silhouette program, 
not printed as above, in the pieces photo.


this is the tea cup card flat for postage, just fold and into the envelope.

EDIT - When I went to the class only 3 people were there and I didn't think, maybe selfish of me, that after all the work I put it in, it was worth doing it for 3 people, so I showed them something else and will wait for the class to grow, the organiser tells me she is going to start doing word of mouth to different classes and clubs who use the hall. So maybe it's won't be too long before these are used after all.

Now all I have to do is plan what to do each week, I need to teach them different things, but have to sort through all the donation stuff first, I have to design at home until then. Help and ideas would be appreciated from you clever ladies, even best size of classes maybe?


11 July 2021

80th birthday

 Hi Everyone, some more of why I have been so busy. Our very long time friend had his birthday last week and I made the Thermometer card  for him. We don't buy presents for each other, but this calls for a celebration methinks, so we bought some Champagne for him to celebrate. I couldn't give it to him as it was and in the morning of us going to his Tea Party, I realised I hadn't got any bottle bags. Off to Silhouette again, (told you in my last post I had been busy with it).

I cut the bottle top with gold card, then added the bottle image with his name and age and greeting. I then printed it out and cut it with the Silhouette. Attached to the gold bottle topper.

bottle tag design - My Scrap Chick
bottle image - Jiovanna's Creations - Digital Scrapbooking Pixelscrapper
gold glitter - Tonic

gold glitter added to the bottle tag image

bottle cover 
I made the bottle cover on my scoreboard by following the instructions HERE.
 I lengthened and made the width larger of the design to fit the bottle. I also added 2 die cut circles to the bottom one outside and one inside, to help with the weight of the bottle.
bottle cover design - Kirstens Blog
card - Craft Sensations
ribbon stash


The Paper Shelter Going Digital
bottle is a digital image


09 July 2021

25th Anniversary and Champagne

 Hi Everyone, an apology due from me for being awol visiting you all. I have been very busy and had a visitor, making time non existent for me. I won't be able to catch up, but I will have a looky to see what I've missed. So sorry.

Anyhow on to what I have been doing in my "spare" time. We had a visit from my niece she saw the bottle tag I made (I'll show you in my next post)  and asked if I could make 10 for a party she was throwing for her friend and husband. Then it was "I wonder if you could do table place names", then "OH! could you do a few tags for parting gifts!"  "Do you have time to make me a card?" Of course I said yes and happy to do it for her. 

The card to start with, I had a paper pad with silver and white paper, after being die cut, it was placed onto white and silver card which had also been die cut. I die cut a 2 corner pieces and die cut them again with a doily design shape. More die cutting with hearts and champagne glass shapes. I had placed the photo into Silhouette and cut around it with another heart that was used as a base. 

patterned paper - Craft Sensations
square dies - Sue Wilson Noble dies
doily kind of shape - Creative Expressions
patterned heart shape die - magazine freebie
champagne die - Creative Dies magazine freebie
ribbon - stash


Then it was out with the Silhouette and off to go, it has been used so often this last week. 

the tag
simple cutting and drawing on the Silhouette,
with a strip of of double sided tape and silver glitter
glitter - Tonic

place name card design - by Bird
 I added the 25 into the top design, then covered it with a 25 and hearts in silver card, I also added silver pen to the initial of each card.
 

bottle tag
I took a champagne bottle image and placed it in Silhouette to print and cut. Before cutting, I added a photo of the couple and their names and anniversary. It was then cut and attached to the bottle tag.
bottle tag design - My Scrap Chick
bottle image - Jiovanna's Creations - Digital Scrapbooking Pixelscrapper
silver glitter - Tonic

the way the bottle image sits on the bottle.
 It sits better on a champagne bottle it's made for, but I didn't have any champagne handy to demonstrate! 😉


07 July 2021

TMR Christmas in July

 Hi Everyone, my card today is for


I decided to do something a little different today and do some cutting, my thinking for Christmas in July? well July is Summer (except in the Southern Hemisphere) and a little drink wouldn't go amiss on the beach would it? I thought the penguin would be happy in most environments, some live near beaches! 

Anyhow off to my digital cutting machine and cut out the images to colour. I did 2 of each, in case I made a mess of the colouring, but wanted the card layered to make it a little thicker. Yes! I could have used coloured card, which I thought would be my go to, in case I failed with the colouring.

these are the layers ready to be coloured

I forgot to photograph the colouring process 😕
I coloured all pieces, the pattern says glitter card for the white body, scarf and wine in the glass, but I decided to heat emboss with sparkly embossing powder. All the pieces were were then glued with wet glue, so there was wiggle room. Googly eyes were added and 2 ribbon bows tied together with gold elastic which also held the "glass" tag.

Penguin Wine Wrapper - Dreaming Tree
white card - stash
inks - Distress Oxide and Ink
sparkle embossing powder - WOW clear sparkle
gem / ribbon - stash


I hope to see your Christmas in July at The Male Room Challenge, don't forget to add the challenge badge, it's a requirement if you want to win.


03 July 2021

Lemon girl

*Disclosure: 
This post contains affiliate links to Creative Fabrica.
that at no additional cost to you, if you use these links to buy something.
 I may earn a small commission.  I only recommend products I would use myself.
 Read full privacy policy Here

Hi Everyone, A mixed media ish? card today with a few processes. I started off, designing it in Photoshop, I chose the sketch but didn't have paper to match for the rectangles, so I made some in PS, using the items, that I eventually placed on top of the matching paper. Then as I wanted to cut the items out, I added them to my digital cutting machine, so much easier than fussy cutting, for me anyway. I added glaze to the elements, I thought it made them look like stickers. 

I found a lemon in my cutting files, so used that as the background to the beautiful image. I had my subscription magazine recently and I used the stamps that were with that, heat embossing them and colouring them. Adding drops to finish. Sounds so simple doesn't it? It took me a fair few hours though.

image and elements - Lemon Girl Planner Creative Fabrica
inks - Distress Oxide & Ink
stamps - Magazine freebies SCPC #218
lemon cutting file - Lettering Delights
lemon card - Crafters Companion
white drops - Nuvo Crystal Drops


01 July 2021

Sssssuper

   Hi Everyone here I am with my DT card for today, it's for the challenge at QKR. Our challenge is on the 1st and 15th of every month, so you have 2 chances every month to enter the challenge.

We will select two winners each of the weeks 
1 using QKR Stampede  or Eureka Stamps image
 and 1 using any image!

Anything Goes every 1st & 15th of the month

I love this snake, if you can love a snake? It's just so funny. Anyhow, I added the snake and sentiment to the digital cutting machine. I print and cut 4 layers of the snake and then coloured it with inks, I decided to add glaze to give her a shine.

The printed sentiment I cut with a die and edged it with inks. I was in a quandary as to what background to do, then decided to ink a shaped background with a stencil, I added more stencils to add grass and clouds. Glitter glue added to her bra and a balloon die, after all that I decided I like it! 😀
inks - Distress Inks
stencils - shape, my own cut
grass/clouds - Funky Fossil
sentiment - my own
balloon die - Cut & Make
sentiment die - Tonic


Penguins

  I have 2 DT cards today this is the first.


Anything Goes but

they MUST feature a critter

Whether Furry, Feathered, Fantasy, Fairytale, Scaly, or Insect, there must be a critter featured...
e are sponsored this month by 

We are sponsored this month by Jan's Digi Stamps and they generously
provided images to our DT use on their inspiration projects.  


A Christmas card today for a change. I started with my image of course and then a colour mix to get me in the mood. I chose this, bright and cheery?

I chose a digital paper for the background which had an ice border, I dabbed some glue around the "ice" and added silver glitter. I took the digital image into my Cameo and print and cut the image and sentiment, I had added an overlay of snowflakes to both backgrounds.

After printing and cutting out the image, I coloured it in water colour pencils, for a change, then some glaze was added to the lights to give them a shine, I also added some wobbly eyes to add to the fun of the image. All were added to the background which had been layered onto silver mirror card. A few die cut snowflakes and my card was done. 
background paper - Jan Jejja Digital Scrapbooking at Pixelscrapper
glitter - Tonic
water colour pencils - Nuvo
glaze - Crystal Glaze Nuvo
wobbly eyes - stash
mirror card - The Range
dies - asstd makes