22 December 2021

Holly go Lightly!

 Hello Everyone, I know I said yesterday was my last post for this year, BUT! I had this poem from Gill Reed and I thought you would like to see it, with a little bit of enhancement by me, with lots of different designers help. 

It's a bit of fun and I think we need more Christmas Spirit. Enjoy.


21 December 2021

Snowman Wishes

 Hi everyone, I hope you are now finished and well underway with everything you need to do, just a few days to go.

My card today is another one I took to the Craft Club, with very limited supplies there, it is easier to take already cut items for them to put together and place onto a card. I also made a couple myself, with a stencil background, (these are shown here,) to send to the younger members of my family.

I made a circle, added the face to it, then a square with a rectangle to make the rim of the hat, I cut it twice to layer it. The nose was first cut from black card, with the hat and face background, these were layered, the holly, was cut from green card and the berries from red, the scarf was cut from glitter card. 

I stencilled the ready made card with inks, and a snowflake stencil. When that was dry, I added the snowman face and other features. The print and cut sentiment was also added. I was quite pleased that everyone at the Club said he made them smile, (which it does me too).
snowman face - Creative Fabrika
holly - Simply Crafty
scarf -mine
hat - mine
sentiment - line pattern Silhouette
stencil - Funky Fossil
inks - Distress Inks
coloured card - Lidl
glitter card - B&M

As this is my last post until January 1st 
I want to say, many thanks for your wonderful support of my blog, you lovely encouraging comments, which make me smile, your help when I've asked for it and most of all your friendship, which makes sharing and blogging so wonderful. 

Wishing you All with love and hugs a
 Wonderful and Healthy Christmas 

20 December 2021

Asstd Christmas Quick cards

 Hi Everyone, a few cards to show you today, lots of piccies! These were quick cards for me.

My first is a card that I printed from Photoshop, a ready made image. When I had it printed I stamped the sentiment and embossed it.

image - Creative Fabrika
stamps - Magazine freebies

this is the side image where you can see the shine.

This an origami Christmas tree, I bought a cheap pad of origami paper and took it to the Craft Club, this was included in the front of the pad, amongst others to make, glad to say they enjoyed doing this.
origami paper & patterns - The Works
star and sentiment - cut on Silhouette 
gold pen - Uniball glitter pen


I had read on Beccy's Place blog that she had enlarged an image to cover an A4 piece of card to make 4 cards from it, so I decided to pinch that idea from her and I made this card. 

It was printed out from Photoshop, then cut into 4, I added them to 4 ready made cards and followed the outline of the poinsettia with a glue pen and the surround of the cut piece of card, to make a sparkly one layer card that had the sentiment on the front, as I had designed in PS. The image is ready coloured for quick cards. 

this is the whole image used on the 4 cards.
image - Creative Fabrika
glitter - Nuvo Pure Sheen

I hope you can see the gold glitter in this 

18 December 2021

Christmas tree and embossing

 Hi Everyone, it's such a busy time isn't it? I think I may be getting to the end of things, lots of cooking still to do though and last minute shopping next week. Then it's, if I haven't got it, we'll have to go without! I think I'm thinking of catering for the numbers we used to have, silly isn't it? At least there won't be much shopping after Christmas. 

Anyhow here's some cards I did recently.

I embossed the card, and added a cut file Christmas tree, I went over the embossing with gold glitter pen and stamped the sentiment on the tree. I thought maybe the all white was a bit stark and added some green DI ink, then to match the paper, I edged it in purple. I decided to go around the edges of the embossed image with a glue pen and add gold sparkle. I wonder which you prefer?

embossing folder - Crafts-Too "Let It Snow Frame"
inks - Distress inks
stamp - Magazine freebie
glitter - Nuvo Pure Sheen
glue pen - Quickie Glue pen
paper - Craft Sensations


15 December 2021

Lemonade cat at Christmas QKR

    Hi Everyone here I am with my DT card for today

This is for the challenge at QKR. Our challenge is on the 1st and 15th of every month, so you have 2 chances every month to enter the challenge.

We will select two winners each of the weeks 
1 using QKR Stampede  or Eureka Stamps image
 and 1 using any image!

Anything Goes every 1st & 15th of the month

I love this image and thought he could be used as a Christmas card,  I went looking for a sentiment to suit him and Christmas, which I found on the web, however, I didn't take the link and can't find it now, - sorry! I started, unusually, for me, by choosing a sketch inspiration for the design. I then chose a few dp papers from the same kit (Frosty The Snowman). I cut them out and attached them to the card, then die cut a gold mirror card centre. I took the image and the background, adding the sentiment to it, into my digital die cutting machine, printing and cutting both the background and the image, the image was cut 3 times. 

After printing, I coloured the image in Distress inks and layered them onto the circle background, all then added to the gold circle. I added clear sparkle pen to the snow on the sentiment and the glass. A few die cut snowflakes, a few gems and it was done. I hope it gives you a smile as it does me.


Lemonade Cat - QKR Stampede
inks - Distress Inks
dp's - Carin Grobe Design
Christmas font - Snow Bold 
mirror card - The Range
snowflake dies - Crafters Companion
sparkle pen = Spectrum Noir


the font link is an affiliate link at no charge to you.


08 December 2021

A wedding, not a Christmas card!

 Hi everyone, I seem to be showing you Christmas cards and not others I have been making, so I thought I would let you see one of the "not" Christmas card I made recently.

The card was for our Godson's Son and his bride, OH! where are the years going?

Due to lots going on and lack of mojo, I decided to recreate, with a few little changes, a card I did many years ago, 2012 to be exact. I have looked to see if I blogged it and can't find it with the date of the photo I have, never mind, we'll stick with this one! I had printed the card out previously, this was more hands on.

I stamped the sentiment and hearts around the horseshoe with a silver ink pad, with quite a few impressions of the ink. I cut the horseshoe and the cat out with my digital die cutting machine and also the white overlay which I embossed. I added clear glaze to the cat, after stamping a heart shape onto him, with the silver inkpad. I then placed them onto the horseshoe and added a bunch of flowers I have had for years. I hope they liked it, they are still on honeymoon, so I hope I will know on their return.

The photo's aren't very good to show up the stamping, the light at the time I took them was awful, not even Photoshop could improve them!

stamps - magazine freebies
horseshoe - a cut file I did in 2012.
(I can't remember if it is copied or I made it up myself, well it is a few years ago!)
cat - is an altered image, I had as a freebie svg file, I wanted it more rounded.
ink - Hobbycraft
ribbon - stash


04 December 2021

Christmas Poem

 Hello Everyone, I hope you are in good spirits? I think you will, if, you read through my post, at least I hope you will!

I have finished and posted all my cards, however I have received a few that weren't on my list, so back to it again! Pressies are mostly done, I hope!

Anyhow on to why you are here.

My card is one, that on a day I had no mojo, was busy and had to get a couple of Christmas cards done, I decided to go to my Silhouette files and I decided to do this, it was just cut the card, add a white card layer behind the cut image, then add silver glitter, a few gems and they were done. I certainly helped with mojo too.

Ornament card - Silhouette Design Store
glitter - Nuvo Pure Sheen silver
gems - stash


Now on to something I think you will like and have a chuckle at. Last year I had a few poems by Gill Reed, my SiL's Sister, she has a gift of putting words together and recently my SiL sent me this of Gill's. I love it and I added a few images and a  gradient, to help show it off which I hope Gill will approve of, I have asked if I could share it with you. Please enjoy. 

If you want to see the rest of Gills poems, you should be able to see them by clicking on her name in the label links at the end of this post.

images are by Marissa Lerin at Digital Scrapbook.com


01 December 2021

Penguin 2CCC

      Hi Everyone, I have 3 DT cards today, this is for -

our new named blog
 

although the rules are slightly different, we still have the same challenge

Anything Goes but they MUST feature a critter as the main focus

Whether Furry, Feathered, Fantasy, Fairytale, 
Scaly, or Insect, there must be a critter...

I have tried to do mostly one layer cards for Christmas this year, last year I was charged to much for the post! My cheapskate part of me took over! 

My card is using the cutest penguin, I added the lights to him digitally and deleted part, so it looks like they are behind his head and I had him stand on an ice cube. I added a background that has pale snowflakes in the image then added the sentiment. I printed it, then added clear glaze to the lights, his eyes and beak and some snowflake dies from mirror card. I didn't want to add another layer under it, so I went around the edge with a glue pen and added silver glitter. A nice light-ish card for posting.
penguin - Creative Fabrica
lights - LouCee Creations
background - SnickerDoodles
ice - Amanda Creations
snowflake dies - unknown
glue pen - Quickie Glue pen
glitter & clear Glaze - Nuvo
Mirror card - The Range


Hopefully you can see the shine on the lights and the face here.

Ellibelle's Crafty Wednesday


Food TMR

Hi Everyone, I have 3 DT cards today, this DT card is for 

So many items possible for this theme, however when I saw this Lobster I decided to use him, I had seen a quote on a vintage card and had copied it, hoping to be able to use it at some time, and, with a little mixing up of the words I used it on my card today.

I took the Lobster into Silhouette Design area and added an offset around him, I sent it to print with the frame of the card, and then cut it. I coloured him with DI's and added a sparkle embossing powder, well it is for Christmas!

I added the printed sentiment layer to the card and added the offset frame as 3D. Then placed the simpler frame on top of the 3D. 

It may be a bit bonkers, but I am hoping it will bring a smile to my Brother & SiL, who do a lot of entertaining and he is a brilliant cook/chef.

coloured with Distress Inks Fired Brick & Candied Apple
embossing powder - WOW Clear Sparkle
border - Aveziur 
cut on Silhouette Cameo 2

this is the insert, I forgot to take a photo of the insert in the card,
 this is before printing.


Kickin' it QKR

   Hi Everyone here I am with one of my 3 DT card for today

This is for the challenge at QKR. Our challenge is on the 1st and 15th of every month, so you have 2 chances every month to enter the challenge.

We will select two winners each of the weeks 
1 using QKR Stampede  or Eureka Stamps image
 and 1 using any image!

Anything Goes every 1st & 15th of the month

My card today is fun Christmas card, this will go to my horse mad Niece. I know it's a donkey, but the feeling is the same, she will see the punny sentiment - I hope!  Her horse had to have an operation on her leg earlier this year, which kept them both locked up from riding and being free for a few months, I know they will have felt like this.

Anyhow, this is a bit of a hybrid card, with lots of different techniques to bring it together. I cut the layers in my die cutting machine then coloured them with DI's, the donkey and gate was also coloured on top of DI's with Spectrum Noir marker for texture. The background is a few layers of snow overlays designed in Photoshop, the gate was shaped to look like it was open also in PS, the tree was cut in coloured card with the other layers, I added rays from the star with gold glitter pen, 
Donkey - "Kickin it" QKR
gate - Creative Fabrica Farmer Bundle
inks - Distress Inks, Spectrum Markers
glitter pen - Uniball
snow background - Creative Market, snow overlays
snow layer - BDR snow background
tree - Sarah Bailey Silhouette Design shop
star - My Scrap Chick
sentiment - web


27 November 2021

Spaceman

 Hi Everyone, I hope you're all up to date with Christmas preparations? Am I - Nope! We'll get there won't we as we usually do.

The weather was so awful last night, I hope you were all safe, we felt like we were trying to sleep in the middle of an airport runway, it really was so bad. Luckily no damage around here. We have sun and very cold temperatures, with the wind still quite high, making it feel colder.

Anyhow, here is my card for today, it was for my GGNephew who was 2 last week. He really is a little darling, although, as they live 6 hours away, we still haven't met him, with Covid etc, except by WhatsApp. 

 I didn't know what to do, so I went through my files, as I usually do and found these beautiful images. All into my die cutting machine to cut out, I glued all layers of the images together, as I had cut at least 2 of each, the spaceman I had reversed one image so that he could be seen from the back of the card too. I then added clear glaze to his helmet, the spaceship and the eyes of the earth. I hung the spaceship on acetate so it was "flying! the spaceman was on 3D stickers so he looked off the page also. The stars were then added to the navy coloured card background. I have to say I was pleased with the end result. 

Spaceman images - CreativeFabrica  
this is an affiliate link, no charge to you, but 
these images and others in the kit are $0.50 today only
card rocker base cut design - My ScrapChick 
sentiment - web
glaze - Nuvo Crystal Glaze
Silhouette Cameo


this is the handsome little chap taken at his Nursery

I need to thank you all for your visits, I really love to see your comments and appreciate them all a great deal. Have a great weekend.


23 November 2021

Happy Birthday masculine card?

Hi Everyone, I'm still rushed off my feet with one thing and another, yesterday I managed to do 42 inserts today for 6x6 and 5x7, designed, printed and cut to size and inserted into cards, well chuffed with myself. I got those out of the way, all Christmas cards are now finished. Whoop whoop!

I'm hoping to at least start writing the cards tonight and finish tomorrow, then concentrate on presents that haven't even entered my mind yet! I'm so late this year. Can anyone lend me some time? 

Anyhow, I made this for one of our God Son's, they get to the adult age of what the heck do I do, he has no hobbies to speak of, so I went plain and simple! Using my die cutting machine to cut the card out of  black card. I printed paper and placed it behind the words then stamped a small stamp onto the card in gold. Nice and simple and bright too, even though it is black card. He liked it, that's all I can ask for.
card - Silhouette Design Store ID #306564
dp - Creative Fabrica Hello Baby Paper Pack (affiliate link)
stamp - Magazine freebie 


20 November 2021

Christmas Candles card

 Hello Everyone, I hope you are getting your Christmas cards done or have finished? I think I may have, just got to check numbers, I'm lucky I have some left from last year. Just have to do inserts, why don't I do them at the time of making the card? 

Anyhow, here is one that I cut out for the Craft Club. I have to say they thought this was one of the favourites and it was extra easy. My blog friend Shirley gives some of her designs as freebies and this was given a few weeks ago. The design includes the whole card, with the oval as an open design, but I wanted to cut 12 using less card on the Cameo and quickly, because of this I just used the front of the original design. I added "veins" to the leaves, just to give them something a little more to do.

The photo colours are not quite right as it was an awful day and late afternoon, the day before class, so I didn't have chance to repeat the photos. It was just layer everything onto the shapes and layer it onto the card. No stress with this card design. Thanks Shirley.
card design - Shirley's Cards
holographic blue card -  B&M
red & green card B&M
gold mirror card - The Range
pens - Silhouette Spectrum Noir
gold sparkle pen - Uniball


I place all pieces in a plastic card holder bag, this keeps them together and
 easier to make sure everyone has the correct pieces.


18 November 2021

Thank you cards

 Hi Everyone, OH! I was going to catch up and found I had literally tens and tens maybe hundreds, (seems like) to comment on, I'm sorry it's just not possible. Please accept apologies, I hate missing you and your gorgeous work. I promise to do better asap!

I want to thank you all so much for your help with my Kraft cards, I have added a couple of suggestions and if you want to see what I corrected, see here, just scroll to the bottom.

These are another reason I have been so busy, I was asked by the organiser of the Craft Club, to make Thank You cards, each one was required to include a Cross as it's a Church Club. I was given a pack of 10 A6 size cards. This is photo heavy, you have been warned.

I started by making 4 the same, then I decided to make different ones. That's the way my random mind works! 

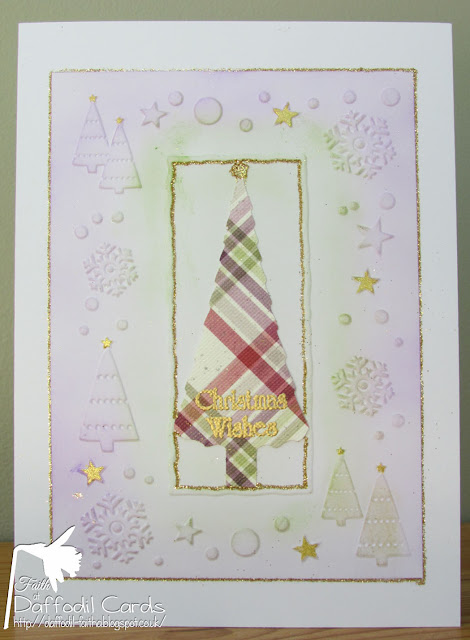
The first I did is the purple with a die cut cross and flower with an added gem and embossed lines. It was inspired by a lady on FB, Shayne Eddie. I don't know if she has a blog. I did 4 of the cards. I have to say this is my favourite.

Cross - Dovecraft, flower - Tattered Lace, sentiment - magazine freebie 

this was printed and layered onto card, 
with a Tattered Lace die cut flower and Nuvo glaze and a gem

this was printed and layered onto matching card with a gem added and
 embossed flowers dabbed in the centre with Distress Ink

another printed card with added gems and layered onto blue card

another printed card layered onto matching card and gems added, 
with butterfly dies by Tattered Lace

both these dry embossed and swiped with Distress Oxide Inks
a piece of aluminium can burned and Sissix die cut corner. One of these wouldn't cut so I left the pieces in. I didn't add a cross to these, hoping they would be enough on their own.

here they are together. I'm glad to say she loved them.

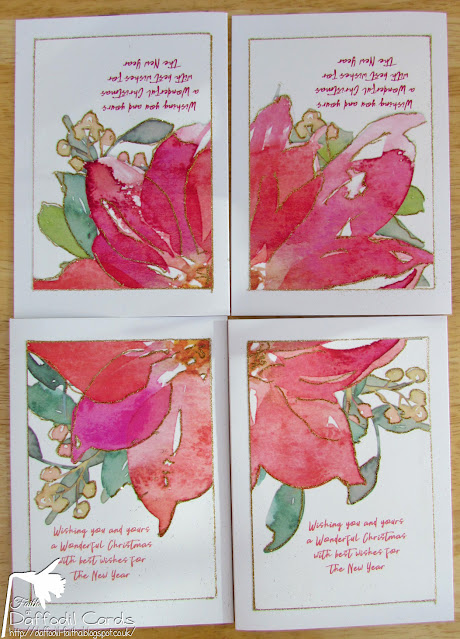
this is the insert in all of them, I found the wonderful verse on the web 
each insert text is coloured to match the card.


by the way my affiliate post to remind you the fabulous Samantha font is here.


15 November 2021

Christmas Magic

  Hi Everyone here I am with one of my 2 DT card for today, it's for the challenge at QKR. Our challenge is on the 1st and 15th of every month, so you have 2 chances every month to enter the challenge.

We will select two winners each of the weeks 
1 using QKR Stampede  or Eureka Stamps image
 and 1 using any image!

Anything Goes every 1st & 15th of the month


I decided to use this Genie for a Christmas card, something different for him I think. I have had the dp for years and they seemed just right for this magic man. I followed CASe this sketch #73

I took the image and papers into the die cutting machine to print and cut, I cut 3 layers to give him strength, then coloured the image with Distress Inks, I added gold and silver glitter pen to help him shine. Then I layered the paper onto the card and dotted red Stickles onto the flowers on the paper, I added the coloured Genie, then die cut a wand twice, in silver and red mirror card placing the red cut pieces back into the silver die cut.  

Genie  - QKR Stampede
Distress Inks
dp - AJ Roberts
wand die - The Range (maybe Make & Create?)
Stickles
sentiment - Create with TLC
Silhouette Cameo


hoping you can see more of the shine here


12 November 2021

Kraft fails?

 Hi Everyone, I am still so busy and maybe this is why these are not good cards, I'm in too much of a rush to make them. I know we show our cards when we are pleased with them, but today I am showing you my failures and asking for your help!

I have been trying to make Christmas kraft cards, but have failed miserably. I see kraft cards on the web, that have been stamped and have the most gorgeous results, being kraft and CAS.  I thought I could do as well, seems I can't! What do I need to do to get good results, apart from wonderful designs? ;D

I thought I would show you my failures and maybe with your advice I will be able to use up the rest of the pack of Kraft card I have and be a little more proud of the result. The colours are different due to different day light.

first two cards are stamps and dies magazine freebies,
 the Cameo cut card is also a magazine free cut file
last card are Altenew stamps and die

all stamps

die and stamping

cut with Cameo

stamped with Distress Oxide
 bell is heat emboss on gold mirror card, die bow.

Thanks for looking and thank you in anticipation of your wonderful advice.

EDIT

I have taken your advice and added a couple of things to make these cards better, I hope you think so. I also tried Beccy's tip on white pencil as suggested by NanaConnie.

 Added some white Nuvo pencil to wreath centre and bow and gem.

Added Nuvo white pencil and coloured in gift boxes.