Showing posts with label Birds Cards. Show all posts

01 December 2024

Slider card CCC

    Hi Everyone, the first of my DT makes today is for -

Critter Crazy

Whether Furry, Feathered, Fantasy, Fairytale, 
Scaly, or Insect, there must be a critter.
 
 
I know there are Christmas cards about now, but my GGNephew was 5 recently, and this is the card I sent him. I love the interactive cards for the children, and decided to make one with dinosaurs, well every little boy loves dinosaurs, don't they? I hope he does :)

I printed the background twice, then cut a narrow slit, wide enough for the sentiment. I then added card to the slider and a Pull instruction tab.
 
Next the dinosaur was taken into Silhouette and I print and cut a couple of layers, they were attached and added to the tab. You know I hate fussy cutting.
 
I die cut the number, coloured it to match and attached it to the top corner of the card, I then covered it with 3D Glaze. I computer generated and printed out his name and it was attached too. After that I decided it needed grass, so off to my Silhouette again and I cut 2 strips to add to the bottom of the image. After cutting I inked the edges.

I also included a colouring page I downloaded from BusyShark.net of a dinosaur and birthday cake.
I can't find the card dinosaur or background in my files. I've had it for at least 14 years. I can only find it in another card I made. But can't find that on my blog either. Duh!
glaze - Nuvo Crystal Glaze
yellow base layer & grass card - Lidl
SVG file for grass - Birds Cards 
Silhouette
number dies - could be First Edition?


This is him using it, during a weekend break with his family.
His Mum always sends me a photo of them, with their cards, which is lovely of her.

22 September 2023

A different Thank You

 Hi Everyone, something you wouldn't normally think about today, but my "quirky" sense of humour made me do it. 

The family decided to spruce up my Grandparents and Mother's grave, it was so black, it was impossible to read the headstone. It was done last week and was like new, we were all so thrilled with it. Anyhow, I decided to give a little thank you to everyone at the stonemason's, as I didn't know how many worked there, I decided to do 6. I thought maybe it would be about that. I know that Funeral Directors and Stonemasons have a good sense of humour, because I knew one a few years ago, and she told me a few things, but that's beside the point.

My idea was, these, I hope it doesn't offend anyone here, but they had a good laugh when I gave them, I hope you can have a chuckle too. I used a paper pad and cut them with my Silhouette. I cut a strip of card and stamped the sentiment, but I had cut it too close to the edge, before I die cut the label, I don't think they noticed as they were laughing a lot. As you can see they are coffins, well it's nearly Halloween and I don't do anything Halloween because we have no callers. A bite size Twix was placed inside, for their coffee break. It's the thought that counts?

paper - The Range
coffin template - Birds Cards
stamp - Uniko
ink - Whispers Pigment Ink
label die - magazine freebie
twine - stash


05 January 2022

Teenager TMR

  Hi Everyone, my post for today is for -


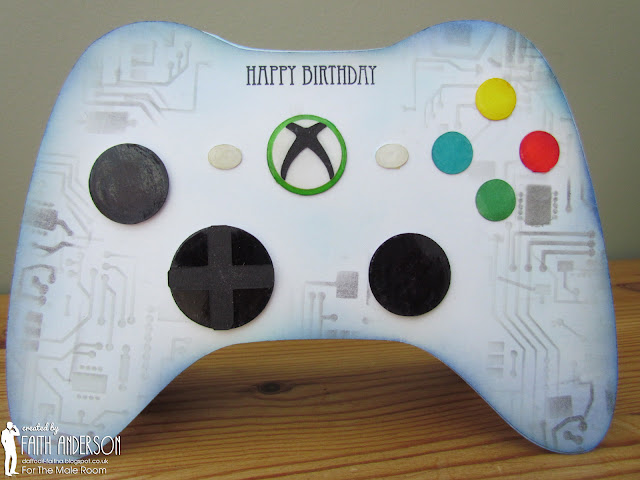
I had a card for my GNephew to make, he is slightly over the teen years, but I think this card is suitable for those techie kids who love their games.

I cut the shaped card and the controls with my digital die cutting machine. I stenciled a circuit board onto the main card, in varying depth of ink. I wanted it to seem as if you could see through the control panel? Oh! well, can't help my thinking! 😉  I stamped the sentiment, then inked the edge with Distress Inks, adding the cut images to the card and clear glaze to the buttons. 

Gamer card - Birds Cards
stamp - magazine freebie
stencil - Funky Fossil stencils
clear glaze - Nuvo Crystal Glaze
cutting machine - Silhouette Cameo

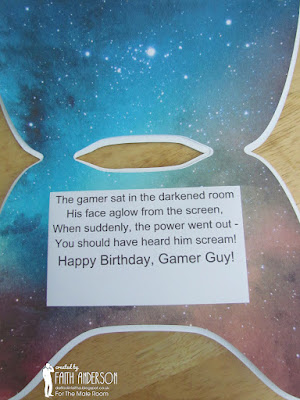
I made an insert in Photoshop adding the sentiment, it was printed and then to my cutting machine to cut the shape out.
the perfect sentiment came from Craft U Print sentiments.


09 July 2021

25th Anniversary and Champagne

 Hi Everyone, an apology due from me for being awol visiting you all. I have been very busy and had a visitor, making time non existent for me. I won't be able to catch up, but I will have a looky to see what I've missed. So sorry.

Anyhow on to what I have been doing in my "spare" time. We had a visit from my niece she saw the bottle tag I made (I'll show you in my next post)  and asked if I could make 10 for a party she was throwing for her friend and husband. Then it was "I wonder if you could do table place names", then "OH! could you do a few tags for parting gifts!"  "Do you have time to make me a card?" Of course I said yes and happy to do it for her. 

The card to start with, I had a paper pad with silver and white paper, after being die cut, it was placed onto white and silver card which had also been die cut. I die cut a 2 corner pieces and die cut them again with a doily design shape. More die cutting with hearts and champagne glass shapes. I had placed the photo into Silhouette and cut around it with another heart that was used as a base. 

patterned paper - Craft Sensations
square dies - Sue Wilson Noble dies
doily kind of shape - Creative Expressions
patterned heart shape die - magazine freebie
champagne die - Creative Dies magazine freebie
ribbon - stash


Then it was out with the Silhouette and off to go, it has been used so often this last week. 

the tag
simple cutting and drawing on the Silhouette,
with a strip of of double sided tape and silver glitter
glitter - Tonic

place name card design - by Bird
 I added the 25 into the top design, then covered it with a 25 and hearts in silver card, I also added silver pen to the initial of each card.
 

bottle tag
I took a champagne bottle image and placed it in Silhouette to print and cut. Before cutting, I added a photo of the couple and their names and anniversary. It was then cut and attached to the bottle tag.
bottle tag design - My Scrap Chick
bottle image - Jiovanna's Creations - Digital Scrapbooking Pixelscrapper
silver glitter - Tonic

the way the bottle image sits on the bottle.
 It sits better on a champagne bottle it's made for, but I didn't have any champagne handy to demonstrate! 😉


15 April 2021

Another Birthday

  Hi Everyone here I am with my DT card for today, it's for the challenge at QKR. Our challenge is on the 1st and 15th of every month, so you have 2 chances every month to enter the challenge.

We will select two winners each of the weeks 
1 using QKR Stampede  or Eureka Stamps image
 and 1 using any image!

Anything Goes every 1st & 15th of the month

I saw this bunny and had to have him for my DT card today, I think he's adorable. I added him to the Cameo so I could print and cut him out, then decided to cut some grass at the same time. I coloured the grass on the cutting mat, so much easier, I coloured the grass area on the background and added the grass stencil, then coloured the "earth". A ploughed field? Strange how my mind works. 

I stencilled the clouds and then on to the bunny, I have to admit to colouring him twice, the first time was rubbish, luckily I had print and cut 2 for layering, so the next was placed over it and coloured again. This time a little better, I'm not really a colourist, but I tried. I added grey marker, to match the bunny, around the edge of the card to layer the image

I used 2 fonts for the greeting Cambria and Beauty Alesha Serif
image - Itching Bunny QKR Stampede
inks - grass & ground Distress Oxide 
bunny - Spectrum Noir Markers
grass - Birds Cards
glaze - Nuvo Crystal Glaze
grass & sky stencil - Funky Fossil


24 June 2020

Dies TMR #139

Hi Everyone my DT card today is for 

https://themaleroomchallengeblog.blogspot.com/

Now this was a challenge for me! I have lots of dies, as have we all? I went through them and saw a bird that I liked and hadn't used, so many haven't been used!  Of course it had to be masculine, and I went through my pads of papers and found this vintage set. Which I felt had a masculine feel, I stamped the bird on part of the paper and layered it. I cut the paper out with a die, then used a digital die to cut the birdcage, adding some leaves after colouring part with a marker and then tying on the the stamped birthday wishes onto the cage. The bird's feet come as a separate die, so I stamped them onto the frame. It's a completely different card to any I have made in the past, with the colours and using so many dies.
paper - Vintage - Craft Sensations
bird stamp and die - freebie from Simply Cards & Papercraft #165
birthday wishes stamp and die set - Simply Made Crafts
leaves maybe - Tattered Lace?
birdcage SVG, using the same set of papers - Birds Cards
gold glitter pen - Uniball
eye - Dovecraft 3D Pearl effect
marker - Spectrum Noir
twine - The Range


here you can see the layers

27 July 2019

Get me out of here!

Hi Everyone, no! I didn't me for you to get me out, just the kitty that is on my card LOL.

This card is for the Limited Runs Progressive challenge  this is the image we were given to play with and I had fun playing with it too. I decided he was playing as a parrot! So I caged him and added a sentiment I thought would be fun.
 kitty playing - Limited Runs digital stamps
coloured in Photoshop CS6 and print and cut with
 the Silhouette Cameo, cutting 3 layers of the Kitty
and 3D layering the glued together layers.
adding Spectrum Noir clear sparkle pens to the "stand!"
background paper - Marisa Lerin Pixelscrapper
bird cage - Birds Cards free svg file, 
I added Uniball gold sparkle pen to give the cage a little gold sparkle.
The cage is layered 3 times on 3D dimensionals.
sentiment - my own computer generated,
 cut and layered then using a corner punch

you can see the layers in this photo and the curve of the cage.


And, as I am showing you a bird cage I thought I would show you a couple of visitors to our garden this week. We usually have these birds in the garden, but in a flock of about 15 of each - a definite NO! I rushed to get my camera as there were a number fighting to get at the feed and nuts, with at least 6 on the seeds and more on the nuts, when I had my camera ready they decided they had better fly into the nearby tree, so these are all I could get.

these are the Blue Tits

this is a Long Tail Tit, looking quite young and hanging on for dear life LOL.

03 April 2019

Happy Chick

Hi Everyone, I took a break from TMR wanting to do more to the poems, but I spent it sick. However it's good to be back with TMR, I enjoy doing Male cards, can you believe it? I have so many men in the family it's hard not to.

Anyhow, my card today is for 

Hubby's birthday is coming up in the middle of the month, so I decided to use the challenge to make his card. Yep! it's a male Spring Chicken LOL
Happy chick - Silhouette Store
background paper - Gina Jane
fence - Birds Cards
grass - Designs by Ziska
cloud - Silhouette Store
sentiment - my own computer generated
font - Aescudos
card - Papermania
all cut on the Silhouette Cameo


I also used an Action Wobble to give it a bit of fun.


10 June 2018

A Greeting

Hi Everyone, today my card is for the Outlawz sketch challenge. One I like to participate in as it's always a challenge to use the sketches.

This time I used a sentiment instead of an image, quite a change for me. I stamped it in black, but it was too stark, so stamped it with the aid of my stamping platform a few times in pink on top of the black, I think it worked?

Anyhow, this is my card.
paper - Craft Sensations paper pad.
pearls - stash
cut file circle- Birds Cards
sentiment - stamp free from magazine
 around the background edge - Sheena Douglas sparkle pens
die - Sue Wilson square pin dot 
pearls - stash
white pearl card - Crafters Companion.

sketch used

20 May 2018

18th birthday

Hi Everyone, a card today for the Outlawz Sketch Challenge, in the middle of making this I realised my friends Granddaughter was 18 in a couple of days, so had to make a card and get it into the post. This sketch helped me do it.

I stamped - yep! stamped LOL, onto vellum and used glitter embossing powder to emboss it, cut it out with a die and coloured it with Promarkers. I cut the circle flower frame with my Cameo, embossed card stock then printed paper for the background and printed the sentiment. I hope she likes it.

stamp - magazine freebie
embossing powder - Papermania
vellum - Dovecraft
flower frame - Birds Cards
cross stitch embossed card - craft outlet
basket weave EF - Crafters Companion Texture EF
gold mirror card - Dovecraft
ribbon - stash


this is the sketch

10 February 2018

Bird houses

Hi Everyone, I suppose today's card could be classed as a slight mixed media? and something a little different for me.

I made this for Beccy's challenge http://beccysplace.blogspot.co.uk/2018/02/february-challenge.html

bird houses coloured in PS - Beccy Muir
bird - Amastery Font extras (yep! from a font!) 
bird wing - made by me in Cameo
branch - Pixelscrapper blog hop
all above print and cut on the Cameo
bird perches - Birds Cards
birthday sentiment - magazine freebie stamp (a real one!)
oval die - X-Cut die
mirror card - Hunkadory
black card - Dovecraft
all 3D and layered onto black card for shadow effect

this is shown with less reflection and the layers


12 November 2017

Snowman & Reindeer

Hi Everyone, my post today is for the Outlawz sketch challenge, I used an image that I have had since 2005, I still go back to these images, but not as I should as they are still great.

Anyhow, I followed the sketch, but kept it a little CAS this time. just adding the frame and gold card and ribbon with the red card. I added Sheena Douglas Sparkle Pens onto the lights and the heart and the bells on the image and extended the base of the snowman in PS. If you think there is an addition in the corner different to the sketch, YEP! you are right, I was just moving the card out of the way and realised I had dripped 2 drops of the sparkle pens onto the corner duh! well I had done too much to put it into the bin, so a matching holly corner and it was OK. I think so anyway. LOL I also added some of the pens onto the holly leaves. The frame and the holly were cut on the Silhouette Cameo.
image - Debbie Mum @ Hugware
sentiment - Create with TLC
holly flourish - Shirleys Cards
scalloped frame - Birds Cards
circle die Tattered Lace pin dot die
red card - Hobbycraft
glitter tape - Morrisons


25 September 2017

October time

Hi Everyone, a card today for the Outlawz sketch challenge, that actually took me nearly 3 days to make, because I wouldn't give up on the cutting with my Cameo. In the end I had too, frustratingly so. If any of you have a solution, I would be grateful in case it happens again.

I dragged images into the design area, traced it all then send to print and cut, all that happened when I sent to cut was, it said it had finished cutting - without actually moving! It would cut if I took the images off??? No problem with anything else! I tried it all ways.

Anyhow, I changed what I wanted to cut and instead cut them out by hand. I added 3D gloss to the acorns and the cup, with a small brush, as it was a largish area, I'm surprised it worked, I thought it may have line marks, I will do it this way again.
image - coffeeforfall-stamplorations
pumpkin layer paper and sentiment - Create with TLC
orange paper - Zesty Designs @ Pixelscrapper
acorns, butterfly - Just So Scrappy
cup knit - Pixelscrapper
scalloped circle - Birds Cards


26 February 2017

Pig Cured!!

Hi Everyone, my card today is for one of my SiL's, she has been very poorly and in bed with the flu, so I thought I would cheer her up with a fun card.

I used the Cameo to cut out the pig, layered the head, nose, feet 3D, the rest as flat layers. I love how fine the eyelashes cut. Then cut some grass, added buttons on the nose and flowers to make it girly, then 3D gloss to make the shine on the eyes.
Pig is a freebie file from Cut files.com
grass is by Birds card
grass DP Amanda Creations at Digital Scrapbooking Studio
Spot DP Sheila Reid at Pixelscrapper
flowers Hobbycraft


Insert spot DP same as above
insert quote Sheila Reid as above.
stamp digitally coloured is by Faith @ From The Heart Stamps


13 February 2017

Welcome to Baby

HI Everyone, my card today is for the Outlawz sketch challenge, I try and do it every week, as it keeps me on my toes, with a timeline. My card was requested by a friend, I did everything different on this. Don't you just love her name?

Text and image by Birds Cards
written by sketch pens with the Cameo on linen card
Papers by Nitwit Collection, free from a magazine
Tattered Lace heart insert die, cut apart.
lace ribbon and pearls in stash
flowers Papermania I used the sketch pen to colour the tips and the heart.
Used sketch pens and the Cameo to make the tag


I thought I would show you, not good photos I'm afraid, but as good as I could get, of one of the 2 chaffinch we have visit our garden this last week.


31 October 2016

Spooky?

Hi a quick post to show you the few boxes I made for the sweets to give out to any caller we have tonight. We have VERY few callers, it's not a big thing in the UK, but I am prepared, and still have a few of these left from last year, which will be ample for my needs, loved these boxes made up and so quick and easy. Thought I would make a spooky photo LOL.

Boxes by Birds Cards.


31 October 2015

Halloween coffin

Hi Everyone, today I thought I would let you see what I am giving the few children we have to our door on Halloween, I cut the coffin shape on my Cameo with a file from Birds Cards so easy and quick. I added a ghosty pumpkin image from Elizabeth Dulemba a kind ghost I thought. I filled them with Halloween sweets. Now I hope I have enough LOL.


08 October 2015

Halloween card

Hi Everyone, my DT card today is for the C.R.A.F.T. Challenge where I had a choice of Autumn, Halloween, Thanksgiving, and Bonfire, I chose Halloween, something I don't do every year. I have had lots of fun in Photoshop doing this, doing new things (for me) and lots of papers and blending options in PS, I know lots of you don't know what the heck I am talking about, but if you DO want to know, I'm here to help :)

I used a Bat background cutting file from Birds cards behind the one layer DP background and a Cameo cut and print 3D upside down Bat and tree from the Deedee digi kit.  When I was putting this together the times I nearly stuck the bat the wrong way up, whoa! so very nearly! The sentiment is from the fabby kit too. Adding the kit promo here, I have just realised, I should have looked at the kit closer as there is a moon and bat in it, would have saved me looking for a moon - duh! I even placed the little bat, in near enough the same areas! I love the upside down bat, he's got a cute expression.


Bats Deedee's Digis
Sentiment tag is a PS shape
metal moon Pixelscrapper
Orange DP Pixelscrapper
Purple DP B Gazarek
Leaf DP MeloVrijhof
Doodle borders Pixelscrapper
Victorian edge - unknown
Spider web Sheila Reid
Bat background Birds Cards
fuchsia card background stash.
Ribbon Docrafts

http://doodlepantryblog.blogspot.co.uk/2015/10/ants-in-my-pantry-digital-challenge-10.html  Anything Goes - Yep!

Outlawz Monday Greetings Challenge October 5, 2015 Halloween Party!  Halloween - Yep!

http://craftycalendarchallenge.blogspot.co.uk/2015/10/halloween-with-crafty-calendar-challenge.html
Halloween - Yep!

"Pick Your Pal" World Card Making Day Challenge!

World Card Making Day ("WCMD")!!! A day set aside worldwide to celebrate our craft. Naturally we couldn't let it pass us by without a special event to celebrate! So here's what we've got for you today: "Pick Your Pal" Tic-Tac-Toe!


As you can see, we've created a fun game board for you. (Click on it to enlarge it if you need to!) How do you play? Easy-peasy!

1. Choose a row on the Tic-Tac-Toe board, make a card using one of our digis that matches that row, share it on your blog or public gallery, and then link it up to our WCMD challenge post using the linky tool.  No back-linking please. You must create a new card for this challenge.
2. Each numbered row on the Tic-Tac-Toe card coordinates to a "Pal" digi that you will receive as a prize for completing that row. There are a total of eight "Pal" digis that you can win, including four from our "Pumpkin Pals" set...
...and four from our brand new, not-yet-in-the-shop "Stocking Pals" set!

3. When you link up your card, please state which row number you followed to create it, and verify that your email address is 100% correct in the link-up so that Deedee can email you your prize!
4. You may participate multiple times to get multiple digis. Each entry must be linked separately, even if you include them in a single blog or gallery post.
5. If you complete the whole Tic-Tac-Toe card ("Blackout") via one card OR by completing three cards representing either all three vertical rows or all three horizontal rows, you will receive both full sets including the additional elements shown in the photos above!
6. In addition to the "Pal" digi prizes shown above, we will also have TWO additional prize drawings at the end of the challenge:
  • One entrant will win a spot as our Guest Designer here on the blog for the month of November! Now, we know that some of you would not be interested in this, so to make sure that we're only drawing from those who are, please, if you are interested in entering this drawing, remember to put "GDT" next to your name in your link-up(s).
  • We will draw for a number between "1" and "9" (eight numbered Tic-Tac-Toe rows plus the number "9" for "Blackout"). Everyone who entered a card for that number of row on the Tic-Tac-Toe card will win a $10 gift code to the shop!
7. DEADLINE: You have until Friday, 16 October, 2015 to complete this challenge. Drawing winners will be announced here on Saturday, 17 October, 2015.