30 March 2021

Floribunda

Hi Everyone, I saw this stamp and as I had a birthday "offer" from the company, I decided to get it. OH! I am so pleased I did, it will be suitable for so many occasions and is wonderful to use. It set my mojo going I can tell you.

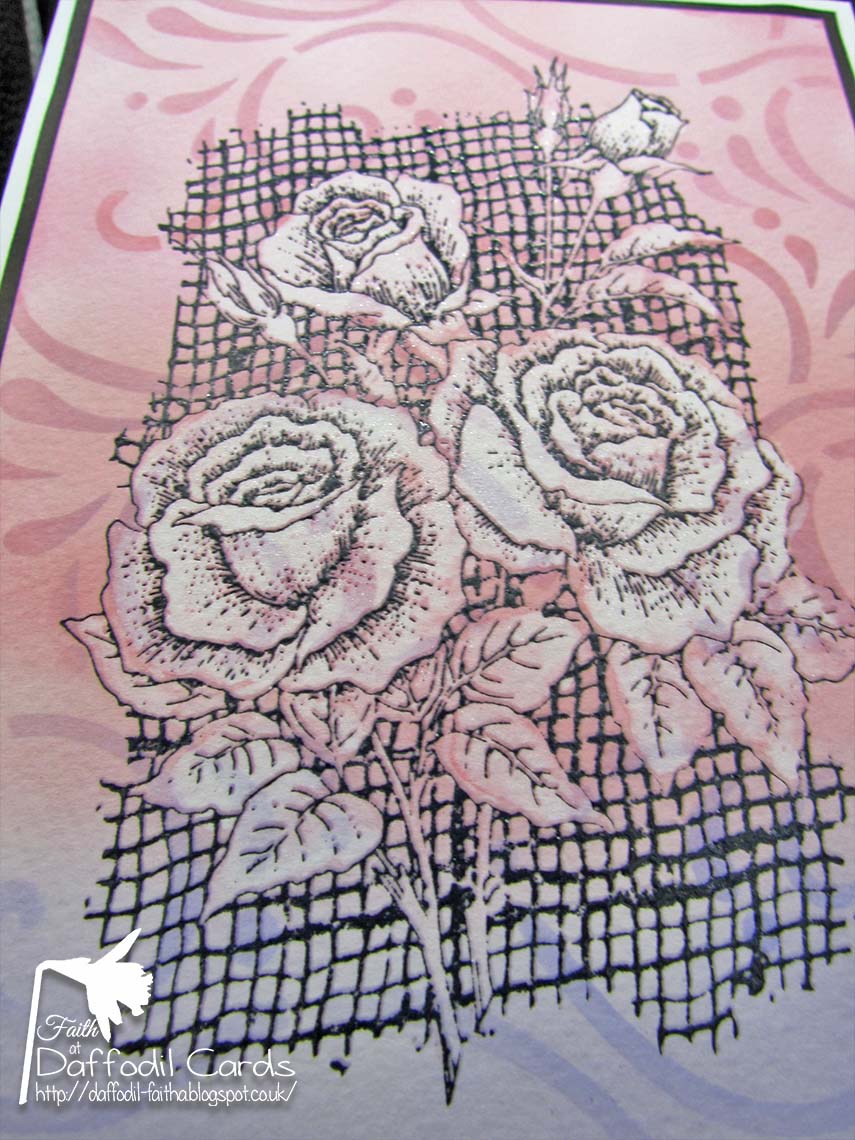
Anyhow, I decided to ink up some watercolour card, then stencil over it in the same colours, it was just a case of stamp, emboss and enjoy, I looked closer and thought those flowers should stand out more, so I took some water and went over the roses sponging up the excess water and the colour at the same time. I love that it hasn't taken all the water and some colour has been left on the card. I just need to add a sentiment when I need a card. I'm thrilled with it, especially using different ways (for me) to add and take away colour.

stamp - Floribunda Net, Chocolate Baroque
inks - Distress Oxides, Worn Lipstick, Kitsch Flamingo, Shaded Lilac
stencil - Flourishes, Imagination Crafts
embossing powder - Dovecraft Clear


this is it in closeup

After I had finished the first card I had to do another and if dinner hadn't been due, I would have done more too, still there is plenty of time now. 
This is so different from the first, I stamped and embossed onto plain watercolour card, then coloured the roses with Pixie Powder, the sheen is just gorgeous, added it to a gold mirror card layer, voila finished! It seemed a cheats way of making a card, it was so quick. Again, I'll add a sentiment when I know what I will use it for.
stamp - same as above
Pixie Powder - Rich Gold, Cosmic Shimmer
mirror card - The Range
embossing powder - Altenew Antique Gold

showing the sheen in closeup 


28 March 2021

Police card

Hi Everyone, my card today is for my Godson who is a Police Dog Handler, I went looking for freebie images on the web as I didn't have anything? suitable for him. Anyhow I found this and thought it perfect, just to remind him he has got a more comfortable mode of transport now. 😀

He has 2 dogs an German Shepherd and a Spaniel, both do different jobs and when he is passing, he occasionally, calls for a visit with the dogs. The German Shepherd is an "On duty" dog, the Spaniel is playful and frisky. He is besotted with them. 

This is a simple card, I printed out the image, layered it onto black card then silver mirror card and black again. I have recently had the sentiment stamp and die and love it. I thought it suited the simplicity of the card. He usually likes it when I make him a card related to his work, I hope he'll like this.

image - web based
mirror card - stash
black paper - Jellybean Crafts
sentiment stamps and dies - Julie Hickey

 As this is a black and white post I thought I would add a little colour and Spring to this post. Here is part of our garden at the moment. We had over 40 Daffodils planted in the border, however they went down not up, so we just have a couple in the corner and in our pots covered with wire as the squirrels were digging them up. 

Sorry their blurred I don't know what I was doing,
but you get the idea?

 I think I may need another camera?
of course it's not my fault they were blurred!


this is actually in focus!


26 March 2021

Scrapbook page

 Hi Everyone, I found this photo of my youngest brother at 16, (he's 73 now) and decided to make a scrapbook page for him. It certainly brought back memories for me, I hope it will for him too. I used quite a few digital designers items, so I won't add them all, just where they can be found, most of the elements and papers are years old and in my files. I enjoyed putting this together, finding I have so many items linked to photography was great, especially for this.

Digital is my preferred way to scrapbook, it's great changing details or deleting and using different to what I started with. I have to admit, it probably took me far too many more hours, than if I did it with paper and dies etc. hahaha I enjoyed it that's all that matters isn't it? He can print it out or keep it digital and I'm pleased to say he was pleased with it.

dp's, asstd designers - DigitalScrapbook


25 March 2021

Flamingo birthday

 Hi Everyone, another family card today, this time for my G Niece it's her birthday today. (She is the one studying to be a midwife). Anyhow, I have quite a few flamingos in my files including a stamp, but decided to use this one, as I loved the sentiment. I took it to my Silhouette and I added an offset to the image, so I could cut it all together in one, then I print and cut it 3 times for layering. 

I don't plan my cards, they "come together" very blasé of me I know. I decided to use a frame, then wanted to use a die background, I couldn't make up my mind which, so put cut them and put them together.

The cut out centre of the frame I coloured in DO's, flamingo colours and after seeing lots of you using Posca pens, I bought one and did a bit of splotting! A new word? well it means splashing and spotting!  Then I thought why not colour the die too. 

Before attaching the die to the frame I noticed I got a little of the ink on the frame, so splashed some more ink over parts of it. Call it a rescue? Then when all attached, the frame being 3D'd, I added the flamingo on 3D pads after I had coloured, used sparkle pen and glaze on it. I hope she liked it.

frame die - Card Making Magic
background die - Tattered Lace
card - cross stitched embossed Outlet Store
flamingo - The Lovely Studio (used to be Pink Petticoat)
inks - Distress Oxide, Worn Lipstick, Abandoned Coral, Peacock Feathers
white spots - Posca pen
glaze - Nuvo Crystal Glaze

closeup of sparkle and glaze


this is the insert I added a party hat to the flamingo and 
some leaves around the edge.


22 March 2021

18th and sketch

 Hi Everyone, my card today is for our G Nephew, who's birthday it is today, as you see by the card he is 18, I didn't have any mojo and discounted every idea, even looking on Pinterest, nothing leapt out to me, until I saw a heading for a card and it came to me. I just hope he likes it. He has a great sense of humour and I know he hasn't seen the photo before, neither have his parents, so if nothing else that will be a little interest. 

I had forgotten to take a photo of the card and just as hubby was about to take it to post, I remembered and put it into the lightbox, took a photo and off hubby went with it, before I could check the quality. I'm not happy with the photo, I'm not sure if it's the grey background that lets it down. I think it has shadow at the bottom and that's not what I wanted. A bit more practice or just taking my time may help?

I followed a sketch and this is what I came up with. 

sketch

papers - DigitalScrapbooking 
sentiment printed onto cross hatch embossed card - Outlet Store
star circle - Just So Scrappy
cupcake - LindsayJane
3D glaze on numbers - Nuvo Crystal Glaze
clear sparkle pen - Spectrum Noir


20 March 2021

Hello again

 Hi Everyone, been quite a few days since I posted anything, it's not that I haven't been busy, I have. I've been doing a few DT cards, so can't show them yet. Also a few birthday cards for family. I don't know where my time has gone each day. I have had a lot of phone calls this week, which has been lovely. OH! yes my biggest job? I cleaned the oven! not something I do very often I'm ashamed to say, and it showed, I took over 3 hours to get it sparkly clean, yuck! I'm not leaving it that long next time! (I hope). I always say that. 

Anyhow on to my card, it was for my eldest SiL, who isn't too well. I had made these cards for her friends and she was pleased with them, so I decided to carry on the theme for her card. I love this digital kit, the papers and elements are just so beautiful. The gilding flakes were added (safely in a box this time, not as the other cards) by adding glue pen to parts of the flowers and leaves.

paper and elements - Carina Gardner Watercolor Forals
butterfly die - Tonic
green card - Centura Pearl Crafters Companion
gilding flakes - Cosmic Shimmer
oval die - Tonic
gold mirror card - The Range
glue pen - Quickie Glue roller


showing more detail of the gold flakes

this is the insert before printing


15 March 2021

Bouquet bear

 Hi Everyone here I am with my DT card for today, it's for the new challenge at QKR. Our challenge is on the 1st and 15th of every month, so you have 2 chances every month to enter the challenge.


We will select two winners each of the weeks 
1 using QKR Stampede  or Eureka Stamps image
 and 1 using any image!

Anything Goes every 1st & 15th of the month

My card today used a sketch, but the file I saved, to tell me what everything was, is mislaid! I'm usually careful where I save files, but this has gone walkabout! I had to go hunting to find out who's paper I had used. My lovely bear was print and cut 3 times for layering, with the digital cutting machine Cameo, I coloured the bear with Distress inks to match the paper I used. The sentiment was also print and cut and layered.  

Bear - Bouquet 
inks - Distress inks
papers - Creative Fabrica
black paper - stash
gold spots - Nuvo Crystal Drops


13 March 2021

Another Happy

Hi Everyone, another Happy card for you out of the letters I cut here. A simple card much like the others, this time I laid the letters into the cut layer to get them straight. They were inked in Distress inks to get the colours, then cut a simple piece of orange on the bottom and a small stamped sentiment. voila! 

A quick post, as I am so behind in other things.  BUT! My hairdresser rang me yesterday and I'm to have my hair cut next Wednesday, the first cut since the beginning of November. Whooppee Things are starting to open up a little in Wales.
Keep safe it's not over yet!
Distress inks
Cameo cut letters
birthday stamp - Magazine freebie
orange card - Lidl


11 March 2021

Lightbox and card

 Hi Everyone, firstly thank you so much for your lovely birthday greetings. I promised to let you see hubby's present to me, be prepared for LOTS of photos and words!

What do I think of it? It's bigger than I thought and although it is collapsible, I think I will leave it up, I haven't room for it really, in my craft room, so I think I will have to see what I can do for space. It's on top of the sofa bed atm. It's convenient there and easy to use, but doesn't look great! It's a big black box after all.

All I did was place the card in the box, take a piccie and adjust the size in Photoshop, I haven't needed to adjust the colour, which sometimes could take me more than making the card! I have done 2 cards and pleased with the result, I have to learn what is good and maybe try and learn a few tricks with it. There are 3 background colours in vinyl supplied, black, which I used, grey and blue. Again I will try each background and see what happens. This box has a 3 pin plug, others I saw had USB connectors. I wanted a plug. I would have bought a smaller size if they had one, the smaller versions had a  "click together" connection to hold the box in shape, I liked the Velcro on this one.

I had a really hard look at the light boxes over a few months while thinking about this and in the end decided that although it was bigger than I wanted, I would have it. I've still got to get used to it and think, maybe, as there is a lip on the front I may need to get a tripod for my camera. 

I have taken photos of 2 cards, a card I made last week, after I put the box together and one of the ones I made yesterday. 

Are you ready for the piccies? The card has just been placed inside with no intention of taking a proper photo of it. The card is 5 x 7. The photos haven't been edited in anyway.

this is the box made up

this is the photographic area from the front

this is showing the top lighted area, it has a white material to defuse the light with a hole, to enable taking an object from the top. You can also see the wires for the LED lights on the left of the box.

this is taken from the top hole of the box, through the white diffuser material

this is a closeup and ready for editing


this is the card I made yesterday taken in the box and
 then edited for size and straightening, I didn't edit the colours.
stamps - Stamps By Me
inks Distress inks
Squeezed Lemonade,  Peacock Feathers, Worn Lipstick
black paper - stash
sparkle pen - Spectrum Noir Clear -
used to "colour" the flowers and leaves and then splattered across the card


this is the effect of the sparkle pen


09 March 2021

Birthday

 Before I start, I am thrilled you liked the idea of the "leather" notebook, I hope to see you have made one. There are lots of different ways to do it, I just chose the easiest! Also the fact I had the "ingredients" in the house. 😉

It's my birthday today, hubby is not computer literate, he can play games on the smart TV, although only backgammon and a card game, he can't see the point? Oh! well I suppose you can't teach an old dog new tricks, at least not all of them hahaha. He wanted me to buy it, as only shops with necessities are open and he wouldn't be able to use the computer without me knowing and showing him how! Aw! Bless him.

Anyhow, he asked what I would really like for my birthday and I had seen something on Liz's Blog that I thought would make life a little easier. So I bought it! A lightbox! Hopefully from now on I can add my cards or whatever already with good lighting without playing around with them to get them with a good light. I ordered it and kept it in it's box until today, so as I hadn't seen it, it's still a surprise! (I hadn't opened it when this was posted!)

One of my old work colleagues has her 80th birthday today too and as she is an avid gardener, I picked out an old image and made this card for her. I added the image to my digital die cutting machine (Cameo) then print and cut, editing the image to make 3 layers, I layered it onto the card and added 3D glaze to her glasses and the age.

image - Seniors Laurie Furnell (Hugware)
sentiment - from web?

this is a closeup of the layers and the 80, showing the glaze

Insert verse - CraftsUPrint
this is the insert I haven't a clue where the flower border came,
 it's in my files and dated 2007!
I took the photo of the insert after I had written inside. so I've blurred it out.


http://craftysentiments.blogspot.com/2021/03/anything-goes-challenge_9.html

http://ttcrd.blogspot.com/2021/03/anything-goes-march-9th-2021.html

https://thecatspajamasrs.com/TCP/march-tcp-tuesday-challenge-377/

http://unicornchallenge.blogspot.com/2021/03/challenge-63-make-it-feminine.html

07 March 2021

Notebook

 Hi Everyone, I have been on the "make" again. I decided to have a notebook for my DT notes I had a couple of nice books that had been given me. The one I chose, I had made a mess of taking the wrapper around it off, why did they stick it to the fab book? Oh! well  it was perfect for a recover and this time I decided leather was the order of the day, so off I went into town and bought a piece of expensive leather! Of course I did! Not! hahaha

I had seen a YouTube tutorial about making "leather" and decided to follow it, I just made a note of the ingredients, now I can't find the particular tutorial for you to follow as I saw it ages ago. I found the note this week! Why do I do that, I really should add the author.  I think there are quite a few tutorials out there.  I grabbed some brown packing paper I had in the house, wet it with water from a spray and just crumpled it over and over until it was very creased, I then took a few Distress inks and spread them lightly over the crumpled paper, then let it dry, it didn't take long at all. The next step, blew me away, spread hair conditioner over the whole lot and let it dry. It actually flattens it too. It became very pliable. Let it dry and add Modge Podge to finish. To add a label, I cut a shape out of gold mirror card with the Cameo and added brads, then slipped in a title and attached it to the front of the book. I'm really loving the finished "leather".

Notebook - stash
brown wrapping paper - stash
Distress inks - Vintage Photo, Whipped Sapphire, Fired Brick
hair conditioner - bathroom
Modge Podge - stash

The notebook and paper I used

The paper crumpled

after being inked and water sprayed

After the conditioner and Modge Podge

The inside with paper added to cover the folds

the finished cover, it's quite flat and not crinkly as it looks, it
 has texture and is quite flat, as a cover should be! Feels good too.

The Corrosive Challenge Anything Goes

Dare 2B Artzy Anything Goes

We Love to Create Anything Goes mixed media

05 March 2021

New Home

 Hi Everyone, I hope you had a little sunshine today and were able to take advantage of it, even if it was only in the garden as I did!  My card today is for my Niece and hubby who have just moved into their new home after a "little" hassle with the process, they were supposed to move before Christmas. Never mind, now all is well and they are in this week, with dog and horse! well not the horse in the house of course. That's a little rhyme there methinks!

I embossed the dies into the card, I saw one recently  that did this and thought I would try it, I love the effect it has, (sorry, I thought I had taken a note of the address to link it,  but didn't). I then die cut the smaller die around the stamped house, which had been coloured. The keys and hearts were stamped onto the embossed card and coloured. All then layered onto black card. Quite a simple card for me, but I'm pleased with it and the result of the embossed dies, I must do this again.

dies - Tonic
free stamps are from different issues of SC&P
Distress inks


03 March 2021

TMR Not A Card not pretty either! and tutorial

 Hi Everyone, it's The Male Room Challenge today
and this post is VERY picture heavy.

It has to be is - masculine.
Don't forget to add the badge to your post, to be included for the winner.

 I have dithered about this for some time, then as I was making these I thought why not use this as my "Not a Card", it's for hubby so suits the challenge and is definitely not a card. I thought maybe you gardeners out there would know about this, but maybe you don't and it's a way of recycling and saving money with your gardening. Maybe not the prettiest of my makes, but definitely the best money saving, so far.

toilet and kitchen rolls
any card
label computer generated


It doesn't matter what card you use for the box, it will get wet in the greenhouse or where you start your seeds off, put it on a waterproof plate, dish or what you have. OR just use a plastic left over veg container to place the toilet rolls, more saving and recycling!
This waste card had been creased in the wrong places, so
 I just cut it to size and creased where needed.


When the seeds have germinated and ready for the garden, 
just take them, plant and now, root full, toilet roll, into the garden.

I hope I remember to show you the result when the plants grow!