26 February 2021

Happy card repair

 Hi Everyone, I used the pieces of my cut out letters in repairing the card I put in the bin! The White letters and red background. I retrieved the card, ripped off the top layer, however quite a bit of the red ripped off too. Which meant I had to cover it or do I just throw it again?

 I decided to try and repair and this is what I did. I used the piece the letters were cut out of and after sticking the letters in place with red tape, they were stuck to the white card so it hid covered the red card. I stamped the sentiment and one retrieved card. It has turned out to be usable, which I'm surprised at, as I never retrieve anything it just stays in the bin, maybe next time I'll have to see what I can do? Thanks to you all for your great suggestions on the repair.


23 February 2021

Floral

 Hi Everyone, I've been missing in action, with lots keeping me busy behind the scenes. However I have done a little card making. My "local" SiL (the rest live in England) asked me if I would make 3 cards the same for friends of hers, all 85 years of age this year. I asked her what she wanted and she said flowers, so this was my interpretation of what she wanted. I'm glad to say she was pleased.


paper and wreath - CreativeFabrica
gilding flakes - Cosmic Shimmer 
glue pen - Sakura Quickie Glue Pen
gold mirror card - The Range
ribbon - stash
Glaze - Novo Crystal Drops
Silhouette Cameo 2

This was the process
I cut and print from Silhouette Cameo, 3 layers of the centre wreath, I went over the top layer with a glue pen on parts of the flowers. I then ventured to the gold leaf and pressed it into the glue. I should have put it into a container, lets say I was finding gold for a few days! Next I layered all the wreath layers and glued them together.

I printed the background layer and cut to size and added to gold mirror card and then to the base card. I added 3D gloss to the 85 for added shine. The wreath was added to the card and a bow placed on it.

here are the layers before attaching and adding the gilding flakes

adding the gilding flakes

here you can see the finished result of the glazed 85 and the result of the flakes

here you can see the layers, which I didn't 3D for the sake of postage costs, it was an 8x8 card, with 3D the cost would have been expensive shall we say. 

This was the insert


We had good news this week about nearing the end of lockdown, let's hope we can get to "normal life in the next few months. Although I don't see it becoming normal before the end of Summer - ever the optimist? 
In the meantime, keep safe and keep wearing your mask. Oh! yes over your nose too! - Please.


19 February 2021

70th foiling

Hi Everyone, my card today is for an old work colleague, she always insists I send her "angel" cards, so for her 70th birthday I chose this image, I thought it so pretty and perfect for her. I print and cut the image and coloured it in DI's, also print and cut the lilac paper with a rounded bottom, maybe I was thinking of our behinds in lockdown ahem! I then added foil for the sentiment. I used a punch again! 😄 for the stars. I also added a foil line around the lilac paper. A little pink card to brighten it and it was done, sounds so simple when I say it like that!

They're promising LOTS of rain for us this weekend, up to 100mm, that's nearly 4 inches, I hope their wrong,  I think it will have to be a crafty day, aw! what a shame hahaha. Keep warm if your covered in snow, dry in the rain and safe from Covid.
paper - Tiny Twinkles, The Lovely Studio (used to be Pink Petticoat)
Distress inks
pink card - Lidl
Silhouette Cameo
WRMK foil pens and foil


this shows how the foiling shines.


17 February 2021

Happy Card plus!

Hi Everyone, another of Gills' poems today, I've tried to add images to match, not sure I am successful on this one, but it's a bit of fun isn't it?
I used lots of different images, that have been in my files since goodness knows when! I knew they would come in handy 😄
bathtub - R Thorn
beach granny - I've had since 2012, file says it's by Otaku, 
however the signature is Emily C?
map - TLC Creations
skier - Birds Cards
Hugware - don't know the artist.


Now for my card today

I saw beautiful cards HERE and loved them so much I thought I would have a go, so out with my Silhouette and I cut lots of Happy's in different fonts and coloured them with DO's. 


My first card I stamped a lovely quirky border and glued the letters on top - wroong! I should have coloured them somehow, they couldn't be seen even closeup with sparkle on them, I tried another layer, which I had coloured, on top, but it didn't stick 'cause of the sparkle! so in the bin it went! 

border - Stamp Addicts


I lost interest then, but later, I put this together after colouring with DO's and I'm really quite pleased with it. The "birthday" stamp is a magazine freebie. The orange card was a snippet.


15 February 2021

Moo-velous

   Hi Everyone here I am with my DT card for today, it's for the new challenge at QKR. Our challenge is on the 1st and 15th of every month, so you have 2 chances every month to enter the challenge.


We will select two winners each of the weeks 
1 using QKR Stampede  or Eureka Stamps image
 and 1 using any image!

Anything Goes every 1st & 15th of the month

I LOVE cows and this image jumped out to me and I had to have it. When I was a child, we lived in a house overlooking a field with cows, one day my mother was ironing, looked up and screamed, there was a cow looking at us from the garden, through the window, out she went like a banshee, the cow was accompanied by a couple of others and were eating the veg in the garden. My mother was a very calm woman and to see her so mad in the middle of ironing just made me laugh then and now. The cows soon left and I can't remember them coming back into the garden again.

Which is why, I just I made the card as I saw it in my imagination - literally, one of the cows flying high over hills and dales with wildflowers blooming. I did what I usually do and went looking in my files for those things, I know I should have looked at my stamps first, but I'm a digi girl at heart. I was lucky enough to find exactly what I wanted. I computer generated the sentiment and found some sparkly light elastic, everything else I had was too heavy, what we find in our stash ay? 

I coloured the cow in DI's and had to add some wobbly eyes and a wobbler too, she was finding strong winds up there sometimes, you can see how strong they were in the video. hahaha
image - Cow Balloon 
Di's - Hickory Smoke, Tattered Rose, Abandoned Coral
wildflowers - Creative Market
hills - Digital Scrapbooking Studio
cloud sky - Tina Shaw Pixelscrapper


Sorry the video is on it's side I tried what I saw, on the web, to turn it, yes! it turned but it didn't save as it turned, so you have to have it as is I'm afraid. You can still see how high those winds were though!


14 February 2021

Die cut

Hi Everyone, a card done from "what can I do today? I found dies I hadn't used for an age, I used my new DO's to add colour to card and then die cut. It didn't look enough, so I stamped a text stamp and hoped it would look better and I think it may have improved it? Just a quickie today.

Hope you're all well and have had at least one vaccination. Keep safe and warm in the snow lots of you have.

text stamp - Clearly Besotted - magazine freebie
dies - I've lost the packaging - but the greeting could be Tonic and the roses Tattered Lace, if you know better could you let me know please?
DO's - Fired Brick, Peeled Paint, Mowed Lawn


12 February 2021

A scrapbook page!

 Hi Everyone, another couple of scrapbook pages. Both completely different feelings in each. My #2 brother's birthday is today and I don't like to let it pass without doing something. This year a scrapbook page. I really enjoyed putting this together with a photo of when he was about 14-16 years of age. I duplicated the page and changed it to Father for his 3 daughters. I added daffodils as it was something the girls had as a memory at his funeral. I love the fact that being digital, I can send a copy to his daughters so they can print or just keep as is.

digital kit - Remembrance 
from a blog train July 2018 at  DigitalScrapbook.com


Then I decided to make another of my son as a lad. We lived in Saudi Arabia at the time and he was a Boy Scout, a very proud one. I coloured the template elements to match the photo, then added papers where I thought they should be.

template - #58 Megan Turnidge
background - Alexis Design Studio
sun paper - Sherry K Designs


10 February 2021

85th birthday

 Hi Everyone, February and March is a busy month for birthdays in our family, so be prepared for lots of cards hahaha. Anyhow todays card is for my eldest #1 brother (I have/had 4) and a card with a story. 

He started his working life as a Fireman on Steam Engines in 1952. At Old Oak Common in Swindon. Put the clock forward nearly 70 years and he and my SiL went somewhere, it could have been Bridgnorth. They, or at least he, likes to visit places where he can see working Steam Engines. On one of their visits he came across this engine and realised, by it's number, it was the first engine he worked on, can you believe that? He was so thrilled, he told the Driver of the engine the story and he asked if my brother would like to go onto the footplate (where the driver and fireman worked.) He jumped at the chance and the driver even gave him his hat to wear for the photo. My brother still has his Fireman hat he had worn on the railway.

He had sent me the photo and I thought, as it meant so much to him, to use it for his birthday card. In Photoshop, I added a mask to make the photo a little more interesting, then printed the papers I had chosen and layered them onto black card then to the base card. I also generated the greeting in Photoshop. I don't know if you can make it out, but the layer the photo lays on, is a picture of coal, well! he did handle a lot over the few years he was on the Great Western Railway, known as GWR or Gods Wonderful Railway to enthusiasts.

My #2 and #3 brothers were also Firemen on the GWR, and I remember them sitting together on a visit home once, listening to a vinyl record of a train going through The Severn Tunnel, yep! they love the Steam Engines hahaha and relating what the fireman and driver would be doing, step by step, going through this long tunnel and being enveloped in smoke. Ah! wonderful times even for me, listening to my brothers reminisce and enthuse about the sounds and memories.

If you are an enthusiastic, ahem! you can find everything about this engine HERE

back papers - Summer Driggs, Vintage Oreos (2015)
coal paper - Photoshop Creative Magazine freebie (2009)
Photoshop CS2020


This is the insert with the larger photo, which
 I also masked to make it more of the engine and my big brother.

Just a little something, I have "prove you are not a robot," coming up when I make comments, has anyone else got this problem or is it just me, if it's just me, how do I stop it - please? 
08 February 2021

Giraffe

Hi Everyone, my card today was for my sassy Great Great Niece who was 2 years old a few days ago. I love these giraffes that I have had for years, I print and cut a couple of layers and the "2" with the Cameo and added them to the card as 3D layers. The butterfly was also done with a couple of layers added to the card and then I drew the antennae. 

I added sparkle on the edge, between the background layers. A few flowers and butterflies were die cut and added with a "few" gems on top of them. After I had added them, I thought should I have? maybe little fingers after them! However I know her parents will make sure she is safe and doesn't fiddle! It's a simply made card, and I hope she liked it?

giraffes and butterfly - Laurie Furnell
butterflies and flowers - Tattered Lace


06 February 2021

Valentine card

 Hi Everyone, I have made a Valentine card for hubby, we don't usually send each other one, but as everyone is making them I just fall in and send him one anyway. He tells me I have Valentines Day every day. hahaha. We have been married 55 years in June, so in a way he's right, aw! Bless him, I've been very lucky. 

We have both had our vaccinations now, him last week and me this Wednesday the third. Neither with any side effects. A funny story (I think) When I went for my jab, I had to walk down a corridor, there was a female army sergeant in uniform waving at me, so as I walked I put my arm in the air and gave her a huge wave, when I got to her, she said, "I waved to you in case you didn't see me, as I'm  camouflaged". Yep! she was in camouflage uniform! I laughed myself silly, I have told this story to a few people they didn't think it funny, I suppose you had to be there, but it was just as well I had a mask on or people may have thought I was mad giggling to myself.

Anyhow here is my card. I embossed an image I cut in Silhouette a while ago, then while the EF was attached I went over it with a DI. I then cut a heart from the coloured card with a freebie die, then another shape heart from a punch, a what? yep a punch!  the little hearts were also cut from a punch. I stamped the hearts, layered the embossed heart layer onto black card, 3D'd all the hearts. Simple, but I think he'll like it. He doesn't "do" computers so I know he won't see it until he has it.

embossed image - Marissa Lerin Pixelscrapper
cut with Silhouette Cameo then embossed
DO - Fired Brick
DI - Black Soot
stamps - For You by Bright rosa
freebie stamps - Thankful etc & leaves - Simply Cards & Papercraft #208
freebie heart - SC&P
punches, sorry don't know


03 February 2021

Steampunk TMR

 Hi Everyone, it's The Male Room Challenge today

The Male Room Challenge

It has to be is - masculine.
Don't forget to add the badge to your post, to be included for the winner.

card - Lidl
Gears N Cogs background - Lizzie Mayne Silhouette Design Store
sentiment - computer generated, out of steampunk style font "Brewery"
rub ons - Craft-T Products  (had for years and years)
Cameo Silhouette 2

A subject I find quite a challenge, I've done a few in the past, on this occasion it was out with the digital die cutting machine. To start, I downloaded a few images  and started with cutting the background out of 2 pieces of 300gms card joining them together to make an embossing "frame". The brown card is very thick, so I sprayed it with water to help with the embossing. After it was dry I added metallic and luster rub on's to the background to bring it out more. 

When that was done and cut to size, I cut the hat and the cogs in different coloured card, then added the metallic rub on's to them too. I also cut some of the cogs and the buttons on the hat out of copper mirror card, for a little extra shine. You can see the shine in this, side on photo. 

I am always amazed how tiny the machine can cut card. The smallest button is just 8mm with the button holes of course much smaller. Even the edges of the cogs are perfect. It's a digital die cutter. For some of you I am talking about "science fiction", for me it's love. 💖


01 February 2021

Ant Hill

  Hi Everyone here I am with second DT card for today, it's for the new challenge at QKR. Our challenge is on the 1st and 15th of every month, so you have 2 chances every month to enter the challenge.


We will select two winners each of the weeks 
1 using QKR Stampede  or Eureka Stamps image
 and 1 using any image!

Anything Goes every 1st & 15th of the month

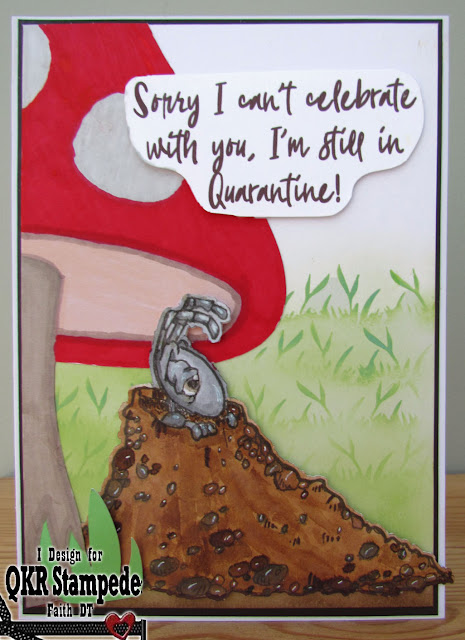
QKR very generously gave us DT a gift for Christmas, we could have anything from their website up to a certain amount, which I was amazed at. As I am in the UK, I decided to use it to have some more images, I can never get enough of them. This is one of them,

I printed the image and coloured with DI's, then added a small touches of white ink to add little highlights to the stones. I stencilled the background of a piece of card with DO's and added a (cut with Cameo) mushroom, that I coloured with markers. As I thought he looked sad, I made up this sentiment, which I thought relevant, printed it, then added some glaze in the corner of his eye, as well as his eye, for tears? I added them to a layer of brown card and onto the ready made card.
image - Ant Hill QKR Stampede
mushroom - Printable Cuttable Creatables
stencil - Funky fossil
inks - Distress Inks & Distress Oxide
markers - Spectrum Noir 
brown card - stash


Chick 2CCC

I have 2 DT cards today this is the first


Anything Goes but

they MUST feature a critter

Whether Furry, Feathered, Fantasy, Fairytale, Scaly, or Insect, there must be a critter featured...

 We are excited to be sponsored this month by 

My card today is part of a win I had from Beccy's, I thought the set so funny I had to have it and decided to use it for the challenge here at 2CCC.

I die cut a piece of card to fit the A5 card I was using to layer the chick onto, then used a stencil to add clouds lightly onto the top of the card and use the same part of the stencil to add the grass , I printed and coloured the chick in DI's then glossed his eyes and beak, I added yellow feathers to his tail, but decided I needed to add something else. 

So - off to my files to see if I had any chicken wire I could use and found an image that I added to my digital cutting machine and cut it out, I was thrilled and felt it just right to add to the card, I 3D'd the chick on top, added the printed sentiment cut with a die with cloud stencil added to it. 

I hope you like it and that I see you at the challenge using a "critter".

 Bea Bird from the Cool Chick Digital stamps set
Distress inks 
die frame - Card Making Magic
sentiment frame - Tonic
stencil - Funky Fossil
chicken wire - Snickerdoodles image
cut with Silhouette Cameo
feathers - The Works


Just showing the glaze on the beak and eyes, (I don't know why it doesn't show above, Maybe the dark days?) and more of the chicken wire.