I am not a professional, in fact I have taught myself looking and searching for answers. I still have a LOT to learn.
The digital stamp I have used is from Meljens Designs Digital Stamps. I had done a previous tutorial with this image and sent it to Melanie for her approval, which I had.
PLEASE DO NOT COPY THIS IMAGE
IT IS COPYRIGHTED BY MELJENS DESIGNS DIGITAL STAMPS.
1. First thing open a new file I have done it as here, you don't have to name it, just click OK.
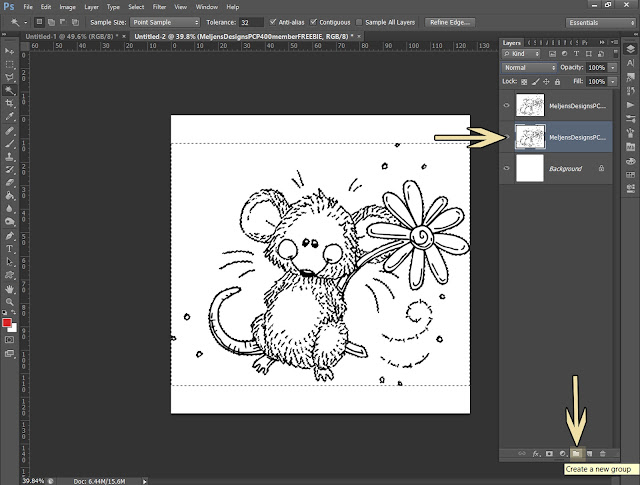
2. Drag or open an image onto the layer. Duplicate the layer by right clicking and selecting duplicate layer, while the duplicate layer is selected, change the "blending mode" to "Multiply"
3. Select the magic wand tool, you will find it on the left, 3rd down in the Tools, select the white area around the image. If it shows a black circle with a line through it, it means you have to "Rasterize" the layer, to do this right click on the layer and select "Rasterize Layer" the box in the right corner of the image thumbnail will disappear and you will be able to select the image.
In my image the magic tool selected the outside only, I need all the white to be selected, to do this press the shift key and continue selecting the rest of the white areas. They will be surrounded by "marching ants".
Go to the lower right and select "Create a New Group" this will add another layer named "Group 1"

4. Go to the lower right and select "Add Layer Mask"
5. You will see your image in black and white on the Group layer, the main image should be white, to make it white we go to "Select" and choose "Inverse" then create a new layer.
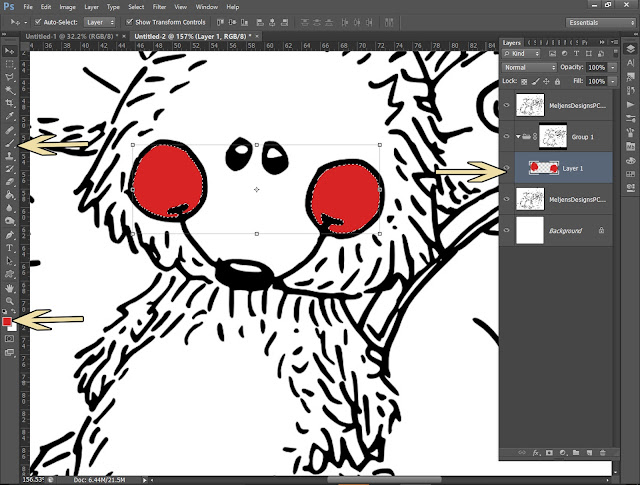
6. Select the Original image and using the magic wand, select a part of the image, as I have done, you will see marching ants. Select the new layer and using the brush tool OR the paint bucket, colour it whatever colour you require. Name your layer by double clicking on it and change the name.
7. Repeat the last 2 steps
If you have an image like mine that does not have complete outside lines, the selection will allow you to paint outside the lines, not something we want.
8. To remedy this go to the change foreground / background tool and select black, paint around your image and see the colour disappear. This is because "black hides, white shows". Any part of your image not being able to be painted a colour and shows white, just alternate between these two and it will correct it. As long as you have selected the mask layer! If it still stays white, try using the colour to colour it.
9. Keep repeating these steps,
- new layer,
- select original image
- magic wand select the area you want to colour
- go back to new layer and paint.
In the future I hope to do a shading tutorial.


3 comments:
that looks great Faith!!
I'll ask my son if I can borrow his laptop with PS to try this!!
It looks like a lot of steps, never worked in layers before. but the result is so nice!
Hugs,Sandra
Thanks for the tutorial Faith....going to have a go later x
Thank you for the tutorial Faith, I must give it a go sometime.
Pauline - Crafting with Cotnob
x
Post a Comment