Showing posts with label Chocolate Baroque. Show all posts

03 August 2025

Flowers WLSC

Hi Everyone, my DT card today is for We Love Stamping. This month, we would love to see your cards with the theme chosen by Hilary of  

Flowers
 
 
with a wonderful prize for the winner from 

Our prize this month is a £25 store voucher from Personal Impressions (inc pps, winner meets costs of any additional spend). Personal Impressions is one of the UK’s leading brand managers/wholesalers/distributors in the arts and crafts industry, specialising in mixed media, papercrafts, card-making, scrapbooking and journaling. PI are proud to represent over 70 brands from global, recognisable brands to small, niche and new.
 

A lovely subject, which I'm sure we all love. I have numerous flower stamps, but I went for an old one. I also wanted to use a new die and a new technique to me. 

I stamped the flower twice on pieces of the same card, then coloured with DI's side by side, trying to copy one to the other. Next, I die cut a slatted square in the top piece and die cut it again, adding a scalloped edge. Then, I 3D attached the bottom piece, matching it to the top.  

I found this sentiment in my files, copied from somewhere, which I printed and die cut to match the top layer. I also found a music file that I cut with the Silhouette, which I added to the edge of both the top pieces.  

flower stamp - Chocolate Baroque Floral Musical
square slatted die - CraftAddictionUK
scalloped edge die - Tonic
sentiment by Edwin Curran
music staff - Scrapcationgetaway 2017
inks - Distress Inks, evergreen bough, lucky clover, milled lavender, victorian velvet
Silhouette 


from a different angle 
I'm sure you agree the prize is wonderful, I hope you join in, see you there? 
 
Here are more photos of our Green Woodpecker, he's come back again, this time not flying away from the Magpie, but hiding from him. The photos were taken in the rain, so not good, but I hope you can see him. 

01 December 2024

Winter WLSC

 Hi Everyone, my second DT card today is for We Love Stamping. This month, we would love to see your cards with the theme of  

Winter
   
 
What could be more Winter than a snowman? So that's what I went with, a favourite happy Snowman. I stamped the snowman and made a mask of him, then stamped the stones either side of him and made a mask of them. With the masks in place, I blended the background with DO's. Then using a snow stencil to add snowflakes, added a touch of water to the ink, but it spread a little, so I added some Stickles for sparkle onto the snowflakes. Next, the stones were coloured and the snowman, adding more sparkle to the snow. I also added 3D gloss to his nose. 
 
Next, I stamped a couple of snowflakes and the sentiment and die cut the sentiment. They were layered onto a blue card which has gold through it. The image was attached to the base card following the CAS #334 sketch.
snowman stamp - Penny Black "Snowy"
stones stamp - Chocolate Baroque "Sticks & Stones"
snowflake stamps and dies - Pink Fresh Mag Freebie SCP 251 
snow stencil and sentiment - Magazine freebie SCP 182
 sentiment die - Julie Hickey
inks - Distress Oxide, mustard seed, fossilized amber, ripe persimmon, peacock feathers, chipped sapphire 

Don't forget, your image must be hand coloured. We now require At least one stamped element on entries. Those of you like us, who love to stamp, we would still love you to enter your fully stamped entry.
 
 
 This month we have Three prizes from AALL and Create, A4 sets Pheasants, Alstromeria and Key Botanicals
 
 
Important - Please read the updated Rules of the Challenge here

01 March 2024

Red Dragon CCC

  Hi Everyone, my DT cards today is for -


Whether Furry, Feathered, Fantasy, Fairytale, 
Scaly, or Insect, there must be a critter.
 

It's St David's Day, the Patron Saint of Wales. You should know by now, that I usually have a special post to wish you all -

Happy St David's Day 

This year I have a card. Looking through my files I came across an Iris folding pattern of a Dragon I had forgotten about, well I HAD to make it, didn't I?

I used tissue paper, something I hadn't used before for iris folding, and it was much easier and flatter to use, in fact, finished, it's not much thicker than a 3D dimensional.

First thing I did was to take the free pattern, link below, into my Silhouette and cut the dragon image and print the pattern. I followed the pattern with the tissue paper, then stencilled the grass hill and clouds. I didn't have an acrylic block to add the small tree stamp, so used the top of an embossing powder container, trouble was I couldn't see if it was straight. However, I liked the quirky angle, as I felt the dragon was fun and could take the quirky.  Next, I attached the finished piece to the base card. Then I added wobbly eyes and drew the nostrils with a fine line pen, as per the pattern, thanks to Sarah, the pattern maker for the idea.

So here is my fun 
Red Dragon of Wales. Y Ddraig Goch
 
  Dragon pattern, others available - Craft With Sarah
tissue paper - The Range
stencil - Funky fossil
tree stamp - Chocolate Baroque
ink - Distress Oxide, tumbled glass, mowed lawn, rustic wilderness
eyes - stash 


A little information.
 Why does Wales have a red dragon?
The History of the Welsh Dragon - Symbol of Wales
It is considered that the Welsh kings of Aberffraw first adopted the dragon in the early fifth century in order to symbolise their power and authority, after the Romans withdrew from Britain. Later, around the seventh century, it became known as the Red Dragon of Cadwaladr, king of Gwynedd from 655 to 682.
 
 
Besides all this, I have a problem. I am commenting on cards and the comment is not coming up on the blog, when I visit next time and check back. Anyone else having this problem?

02 April 2023

Real Bird WLSC

Hi Everyone, my DT card today is for We Love Stamping 
the theme this month being "Anything Stamped with Birds or Animals". 

My card today is a bird, I have been frightened of this stamp since I had it. It has so many small parts that I didn't think I could do it. I'm not the best stamper, that is why I joined the DT, so that Brenda, could stretch me, and I can tell you I was stretched with this card. 

The stamp set, as I said, has tiny stamps, and each of them represents the coloured parts of the bird, a Blue Tit. I cut a square of water colour card, as I wasn't sure what I wanted to do, design wise.

I stamped the branch, using 2 colours of ink on the stamp, not done before, then added a watercolour pencil for shadows. The feet were stamped, near enough to the branch, it was just of landing! Don't say it hasn't got its wings out! :)  The outline of the bird was then stamped, and fit the different stamps in the right colour, inside. I am so chuffed I managed to do it practically all inside, and in the right place. Well apart from a slight correction in one part, but I'm not letting you know where! 

As I hadn't planned anything, (I didn't think I could do it). I had to think what to do for the background, and decided to do more stamping, simpler this time, stamping a part of a tree in the 3 corners. It needed something else, and I noticed that there was a tiny flower stamp in the set, so I stamped a little flower amongst the leaves and added a darker centre, again with watercolour pencil.

Thinking CAS, was not an option for me with this bird, so off I went and found some digital paper that matched the colours and even the stamped flower, so lucky, I used in the stamping. I added them to my Silhouette and made a square frame to fit the bird square and the background, then print and cut them out. I also cut 2 layers of white card to the printed square dp to raise it up off the bird. A sentiment was stamped and die cut, then coloured to match, and placed onto the dp square. Whew! it was finished, and I'm pleased with the result, as simple as it looks. Perhaps I won't be as frightened next time?

bird stamps - Simply Cards & Papercraft Magazine #165
tree stamp - Chocolate Baroque 
sentiment stamp & die - Julie Hickey
digital paper - Simply Cards & Papercraft Magazine #215
inks - Whisper pigment inks (very old)
inks - Distress Inks, vintage photo 
watercolour pencils - Nuvo Vibrant
 
These are the lovely prizes you could win for your entry
 

3 prizes, AALL and Create Elegant Peacock, Serengeti stamps and Starry Night stencil


05 March 2023

Spring Lamb WLSC

Hi Everyone, my DT card today is for We Love Stamping 

the theme this month being "Anything Stamped Spring Is InThe Air". 

Please share our challenge logo

Spring to me is Lambs, when we travel around the countryside here, we see lambs and I love them. I had a stamp with a Lamb and her Mum, so off I go.

I chose a couple of Spring named digi papers and print and cut them out from the Cameo, so I had the shaped corner. Also cut was watercolour paper, onto which I stamped a little bank for the sheep to stand on. I stencilled some clouds and also stamped some birds. I stamped and embossed the sentiment, then coloured the bank and the sheep with DI's. Would you believe it? I actually fussy cut the sheep and placed them onto the bank with 3D pads. The centrepiece was then added to the dp and the card. I'm quite pleased with the 3D effect of the sheep. 

sheep stamps - Magazine freebies SCP
bank stamp - Chocolate Baroque
sentiment stamp - Violet Studio
inks - Distress Inks forest moss, mowed lawn, hickory smoke, pumice stone
dp - NibbleSkribbles 
Silhouette Cameo


Beautiful Penny Black prizes this month


18 February 2023

Lighthouse WLSC

Hi Everyone, my DT card today is for We Love Stamping 

the theme this month being "Anything Stamped with Stencil Option". 

Please share our challenge logo
 
Looking through my stamps, I decided on this lovely Lighthouse. I stamped it onto a die cut piece of card I had left over from something else, then embossed with clear powder. I masked the lighthouse and inked the background, using a stencil to enhance the clouds. The birds were stamped onto the sky, then the lighthouse was painted with DI's. Using another part of the stencil, I inked the sea in 3 different colours. Before attaching to the main card, I matched up the wave stencil again and inked through the stencil onto the card. The lighthouse was added onto the stencilled waves and card. 
 
Not planning anything on the end result, I had to choose a sentiment. Looking at the lighthouse, I decided it was a rough day, so selected the sentiment to suit. I know the card will be ready for a "rough" time or event I will have to send a card for. Sorry the photo isn't up to standard, the weather was awful when I took it, so dark and miserable.
 
die - Card Making Magic 
lighthouse & birds - Magazine Freebie
stencil - Funky Fossil, clouds, waves and grass. 
inks - Distress Oxide, tumbling glass, faded jeans, hickory smoke, iced spruce
inks - Distress Ink candied apple, hickory smoke, iced spruce
embossing powder - Papermania


There are Super prizes from Highlight Crafts of a stamp set and die, 
and chance of a Guest spot too. 
I hope to see you there.


18 January 2023

Favourite colours WLSC

Hi Everyone, my mid month DT card today is for We Love Stamping the theme being "Favourite Colours". 

Please share our challenge logo

My favourite colours are - anything, but I prefer bright! Love gold too, so here is a mixture of colour and gold glitter.

Something so different for me, I stamped the different snowflakes in different DI colours, I needed to fill a few spaces, so I looked through my stamps and found a generic stamp to fill them. It was then stamped in different colours also. Taking the outer die of the snowflake in the kit, I stamped inside it and added gold glitter pen to the outside of the die cut. It was 3D'd in the middle circle of one of the large snowflakes. The layer was then attached to gold glitter paper.  

stamps & die - Chloes Creative Cards. magazine freebie SCP 225
generic stamp - Chocolate Baroque
inks - Distress Inks. broken china, dried marigold, squeezed lemonade, milled lavender, barn door, scattered straw, twisted citron, cracked pistachio.
gold glitter paper - Papermania 
 

 There are always fabulous prizes, why don't you join us at the My Favourite Colours Challenge? It lasts all January, the only criteria is, that stamping must be to the fore. Simple isn't it. 

 Can we please draw your attention to a change with regard to entries using Instagram. As this format does not offer the option to add a working link back to our challenge, in future they will not be eligible and deleted. We are doing this to be fair to the majority of entrants who do comply with this requirement.

My son was quite unwell last Saturday and after a couple of calls to 111, talking to a Paramedic, we were advised to take him to A&E. We got there at 5.45pm and after a lot of sitting, a heart trace, blood samples and X-Ray, with good news at the end of it, we got home Sunday morning at 6.45am, talk about being shattered doing nuffin! But try to put my son's mind to rest, it was exhausting. Only twelve and three-quarter hours. There were no ambulances outside, just 20 people with carers to add to the number. We all left about the same time, although a few people gave up the wait. I hope I don't have to go through that again in a hurry.

A joke with Alexa this week, I just had to add.

Question - What is the opposite of ironing? 

Answer -Wrinkling! 

 Have fun and enjoy the weekend


10 January 2023

Reindeer - smile!

 Hi Everyone, my card today was made when I saw a challenge I couldn't resist. Must be my sense of humour or something!

Anyhow, I knew I had this Elk in my files, he always makes me smile whenever I come across him. I went looking for a sentiment or quote to suit the challenge and him, and found one. So off to my 'puter and Cameo and print and cut the image 3 times, also selecting the antlers and cutting 2 each of those and the quote for the front of the card. 

I was going to leave him as he was, but decided to add some shrubs to keep him company, so I brushed over some green for a distant background and then stamped the shrubs, colouring them slightly.

The antlers were coloured, then the body, they were all attached, and then a white pen was added to his teeth, 3D glaze was added to his eyes, those perfect teeth and hooves. He was placed onto the card front with the quote, which were then attached to a brown card base and glued to the front of the card base.

image - Beccy's Digital stamp
inks - Distress Inks, brushed corduroy, vintage photo, walnut stain, gathered twigs, forest moss, mowed lawn,
white pen - Uniball
quote - web
stamps - Chocolate Baroque, Trees a Crowd
brown card - stash


you may be able to see the 3D glaze?  You can see the layers of the antlers.
 
I was a Winner and now Queen of Snark

Beccy's Challenge January 

05 October 2022

Sympathy TMR

Hi Everyone, my card today is for 
 
Clean and Simple is something I try very hard to do. This card came about as I was looking through my stamps and I realised I hadn't used this stamp, and others on the sheet for that matter. Anyhow, I stamped it onto a piece of spare card I had on my desk, just about big enough to die cut it and stamp the sentiment also. I then die cut a frame with a stitched edge, made a mistake while joining up the “stitches” hence the doodle, I think I prefer it this way.
tree stamp - Chocolate Baroque
sentiment - Woodware
ink - Memento tuxedo black
centre die - Tonic
frame die - Card Making Magic
 

18 July 2022

Post Box

 Hi Everyone, a card today being sent over the pond. I thought it would hopefully be British enough? I stamped the image and using a mask I made and cut from the stamped image, then added little odd stamps to make more of a scene, I coloured everything in DI's, the tree was sponged to make it a Summer tree with a  makeup sponge. I 3D'd the main image onto the card base. That simple really. I hope it's liked.

post box - Chocolate Baroque - Vintage Post
background tree - Chocolate Baroque - Trees a Crowd
all other stamps are Magazine Freebies, mixture of designers
inks - Distress inks
gold ink - Kuretake


showing the gold ink, sadly not the shine as it wasn't a good day, when I took the photo


18 June 2022

Dragonflies

 Hi Everyone, I think all my 'puter problems have gone away, my son went into settings the other night and the next thing I know I can comment on everyone's blog, so it wasn't Blogger or Google at all, perhaps I should apologise to them? I'm sorry to say that I won't be able to catch up with all your posts, but I promise to scroll through and see as many as I can, just not commenting on each one. Thank you for all your comments and advice, I appreciate your support

Anyhow, I think you have had enough of me going on about my 'puter problems, so I'll show you another card I did without my 'puter.

 I've had this Dragonfly in my stash a long time and when I go through my stamps, I think, I'll use that and then go on to something else, so at last I've used it. It also brought to mind that I was going through the web not long ago, after seeing a few Dragonflies on a visit to my brother and SiL and came across this symbolism of a Dragonfly -

A dragonfly symbol represents change and transformation. It is a reminder for you to shed more light and joy in your life. It tells you not to remain in the dark or the shadows. 

I thought it very apt after what's been happening to me this last week or more.

I had a scrap of this paper left after another project and decided to use it with a case of a card I saw in my magazine (which included the stamp) card ideas. Of course now I can't find it to link it! I stamped, using inks to match the paper, the panel and the dragonflies and embossed them with clear embossing powder. I layered the panel on card to match the paper and found ribbon to match it all. Not only that, but I stamped the sentiment in the same ink as the dragonflies.

Dragonfly and sentiment - Magazine freebies Simply Cards & Papercraft
sentiment panel stamp - Chocolate Baroque
ink - (very old) Whisper Archival ink
paper - Craft Sensations
card - Dovecraft
ribbon - stash


Is it me? Or is the font very small on here and on other posts. I have tried changing the font and the size to make it larger, nothing seems to work, is this Blogger? Or me again? 

I have just checked in Preview and this is large, why isn't my blog post? OH! Flipping Eck, here we go again!

11 June 2022

Did you miss me?

 Hi Everyone, I have had my computer die on me, it was 9 years old and it has been faithful friend. I ordered it and after waiting a week for a new one with all bells and whistles and Windows 11! I am back on line, however I have quite a bit still to do to make it feel like mine, so won't be around until next week, hopefully earlier? There is a difference to seeing files etc to get used to and I did have a program? or a fix? for me to see my Photoshop files as thumbnails, but now I only see the logo and name of my files grrrr. There are a few things like this to tackle, so I hope you will understand my lack of visits.

A new printer and computer in a couple of months? Thankfully I had had another new thing needed!!! within the same time frame, a drive for my old computer, which thankfully is able to be used in the new 'puter and because of this I have all my files. I think my Guardian Angel thinks I'm made of money? but did save me stress with not losing my files. My son has spent a few hours or more on getting it all up and running for me, now all I have to do is tweek things a little to suit me. At least that's the 3 things they say will go wrong if one goes?

Thank you all for your continuing comments. I really appreciate them all.

This lack of computer did in fact do me a favour, as I did a few stamped cards that made me think differently. I also did a clean up in my craft room, still a little way to go, but the worst is done - except for my ribbon drawers, ugh! 

This is one of the cards, done in a rush and delivered before I realised I had forgotten to take the upright of the card duh! I was trying to show you the shine I had. I mixed gold watercolour paint with the watercolour ink to get a shine and then added little dashes of the gold paint on it's own on the background. I diecut the image and added it to some blue card I found during my sorting. that was just the right size with a bit of straight cutting,  The cross and sentiment were cut from the offcut of the main image.
stamp - Mosaic Flower Chocolate Baroque 
ink - Distress ink
gold ink - Kuretake Starry Colours (bought after I saw what Greta did on her cards)
pin dies - Card Making Magic
cross die - Cut it and Make
insert sentiment - Magazine freebie
  
  
 this shows how shiny it was
 
this is the insert, a piece of the blue card with the gold paint used as edging.


It's also our 56th Anniversary today and hubby has surprised me with a meal out tonight, he said after all the stress this week with the 'puter and a couple of other things, he and I need to relax and concentrate on us for a change. Isn't he a darling? We don't usually celebrate "ordinary" Anniversaries, so this makes a nice change. I also had the most beauitful card with a beautiful verse, something else we don't do. I felt awful as I didn't do one for him! I'll have to make it up somehow?

Anyhow, apologies for a long post enjoy your weekend. I hope to visit asap


09 January 2022

70th birthday

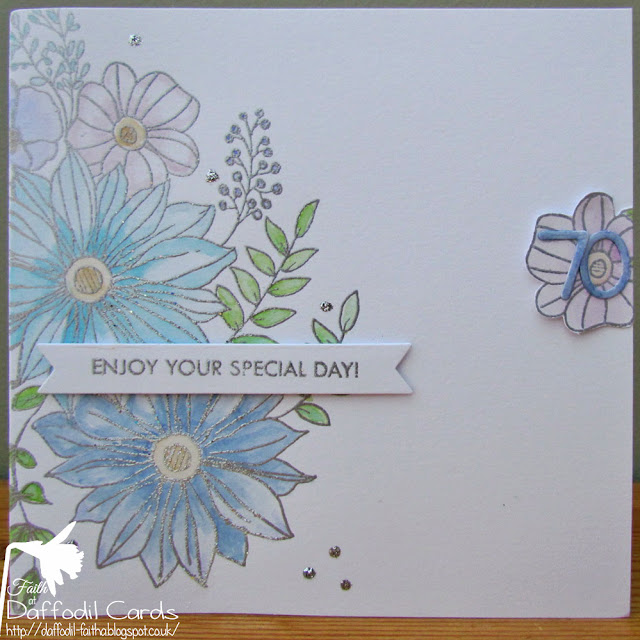
 Hi Everyone, my card today was for our, now retired, Illustrious Leader of The Male Room. It was so sad to have Jane step down to do other things and hopefully enjoy "old age". I shall miss her. 

I stamped and embossed, in silver, the floral image and coloured it in Distress Inks, I decided to go pale, as it was a Winter birthday. I then stamped it again and fussy cut the flower shape, which I added onto the opposite side, with a die cut 70 added to it. A few dots of silver Stickles and 3D glaze onto the 70, the addition of a stamped sentiment on a die cut shape.
stamp - Stamps by Me
inks - Distress Inks
number die - lost it's packet (sorry, could be First Edition) 
sentiment stamp and die - Julie Hickey
Stickles - silver
3D glaze - Nuvo Crystal Glaze


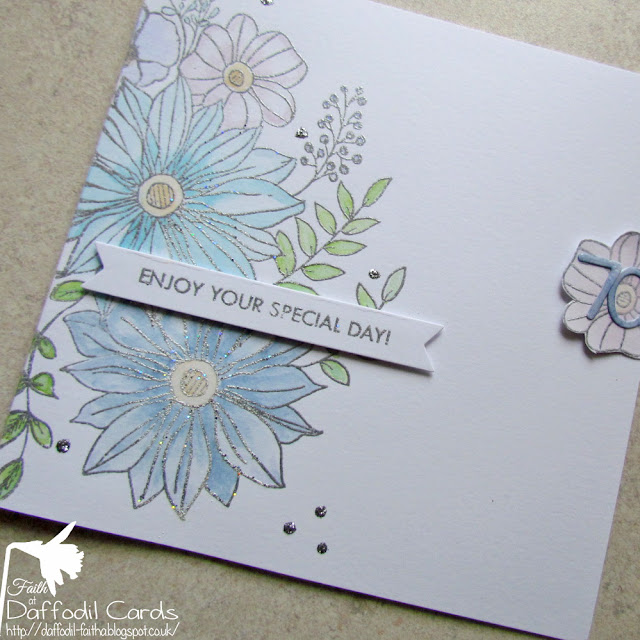
hopefully you can see the embossing clearer in this photo

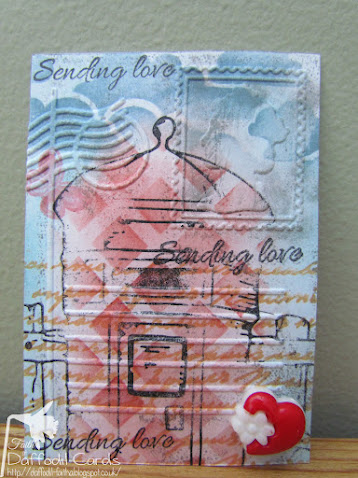
Jane is also a collector of ATC's, so as a Team, it was decided to send her an ATC also. This is the first time I have made an ATC, I hope she likes it.

I stamped the Post Box, text and sentiment. I stencilled the clouds and the Post Box. I shaded around the edge of the ATC, then placed it into an embossing folder of a Post Card, inking over it to bring out the details.
Post Box stamp - Chocolate Baroque
sentiment - magazine freebie
cloud stencil - Funky Fossil
 diamond stencil - mag freebie by Ranger Wendy Vecchi
Post Card embossing folder - Crafters Companion
butterfly stamp - mag freebie
inks - Distress Inks
button - stash


19 July 2021

Floral Music

Hi Everyone, I hope you UK ladies are not melting in the heat, nothing compared to some other countries, but sooo hot for us. This afternoon it is 30C 86F. I've escaped to my North facing craft room and although still hot, it's not as bad as outside.

Anyhow, the stamping I did today was actually done months ago, but it has been screaming at me to use it for a long while, today I plucked up the courage and found paper that actually matched the colours I used. I also found a sketch I could use, as the paper was die cut to the inch of it's life, now just more tiny pieces left. A few sequins to finish off.

A simple quick card today, just the stamping 3D'd, the bottom paper layers added to the card and a die cut sentiment. One of the 24pence dies I got in a sale recently.

stamped image - Chocolate Baroque
paper - Craft Sensations
die - Cut & Make, The Range
sequins - stash
the sketch, not colours of course - #390 CAS Colours & Sketches

Hope you're all keeping cool and sane!

Chocolate Baroque Beautiful Blooms


Affiliate links if you click on the link I may get commission.

Great free classes on everything here. 

Creative Fabrica

20 June 2021

Unexpected stamping

 Hi Everyone, as you know I have been without mojo for a while and thought it had gone for good, then a blog friend said she would send me Mr Mojo and she did! It ended up with this card, thanks Aimeslee.

I know it's father's Day, but my card has already been posted for that here.

I had a piece of card in my bits box, most of which I threw out last week as I never look in it, so why keep it ay? Anyhow I still keep adding and this piece was cut for some reason and I thought I would play and see what happens. 

This card happened, you can't see I stamped on the reverse before this! I got some inks out, grabbed them blind, as I did the other week and thought whatever colours come out will have to work or it's in the bin, what chance brought out these bright colours was certainly worth it. I also grabbed the stamps and hoped they would work, after adding the centre frame heat embossing in white, I decided to add more grasses and the sentiment and used black ink.

I looked for backing paper and found an old Japanese themed paper pad, which worked beautifully (I think). Looking for a square frame die I had forgotten about this corner die, so I added that with 3 layers and heat embossed it also, for a nice shine. Mr Mojo was certainly in the room and guiding my hands. I hope he stays a while. I missed him.

stamps - Oriental Grasses, Chocolate Baroque
sentiment stamp - magazine freebie
dies square - Sue Wilson Noble dies
corner die - Card Making Magic 6x6 collection
inks - Distress Oxide, Mustard Seed, Spiced Marmalade, Carved Pumpkin
black ink - Stazon
white embossing powder - Papermania Seafoam White
black paper - stash
Japanese theme paper - Kaisercraft


27 April 2021

Information and stamping


Information for email subscribers


Please note that the following information only applies to 
those who follow my Blog via email subscriptions

Google has announced that in July it will discontinue it’s Feedburner email subscription service that allows you to get email alerts of new blog posts. As a result I have changed to a new provider called follow.it.  All of you who have subscribed to receive email notifications of new posts on my blog should have received an email from follow.it.   asking you to confirm that you want to continue to receive notifications. If you don't confirm then you will be unsubscribed and will no longer receive emails. Alternatively you can click on the green follow button on the right to subscribe.

 Other ways of following my Blog remain unchanged.
Thanks to Shirly Young for her words here.

Now my post for today - 

Haven't we been so lucky with the beautiful sunshine in the UK, to make us feel happier. I can live with sunshine everyday, how about you. I don't mind the rain at night though.

It's one of the same stamp I did the other day I stamped and coloured, but didn't know what else I wanted to do with it, after a long while with no mojo and couldn't be bothered, I came up with this. I still have 2 others waiting in the wings with the same stamp. I cut an oval frame and before adding I used the inside of the frame as a mask to ink outwards from the image, I kept the mask in place and used a border die to "sort of" match the music bars, I stamped the birthday wishes the frame was added and also a bow and a button die. I layered onto the same card I cut the frame from and added it to a ready made card base.

Stamp - Flora Musica, Chocolate Baroque
border stamp - Stamp Addicts
sentiment stamps - Magazine Freebies
inks - Distress ink, 
oval die - Tonic
ribbon - Ikea
heart button die - First Edition