28 May 2023

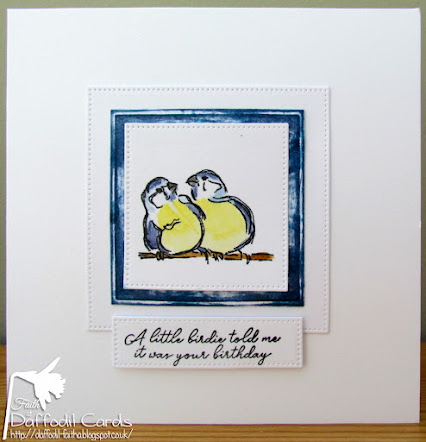
Little birds

 Hi everyone, I was sorting through my stamps the other day and saw these NBUS stamps, amongst many I may add. I had to make a quick card, so I made a card in the style of Christine Stokes, and die cut 3 squares, the middle one just a plain die cut which was embossed, to enhance the edge. I also rubbed an ink pad over it to add a little something? 

The birds were stamped on the smallest square and coloured with DI's, I thought I would make them blue tits, they are so pretty. OK! In the style of blue tits! I then stamped the sentiment from another set of stamps. Layered the dies and 3D'd the sentiment. Quick and easy? Well, it was when I had worked out where to place the sentiment. 

A quick post today. I hope you are all enjoying the sun?
inks - Distress inks faded jeans, squeezed lemonade, shabby shutters, chipped sapphire, black soot
dies  - I've had them for years, could be all Tonic?
all stamps - Magazine Freebies, Simply Cards & Papercraft


25 May 2023

Cheers!

 Hi Everyone, I've been in playing mode, at last. I have a few stamps that I really have to use. This is card has some of them, using 2 sets of stamps to put these together. I stamped the main celebration image, then decided to add corners to it and decided to copy myself from this card and add the Cheers. I coloured them with DI's and dripped a big spot, that was not removable! I hate wasting what I attempt and try to do something with it. Hence, the shape of the image and corners.

Looking through some sketches to see if anything worked, I saw one that I could adapt, with a digital paper I found too, which I thought could work. I printed it and added it to red card. I cut a very narrow border then used a couple of off cuts for the banner shapes. Whew! A rescue that didn't turn out too bad.

I then went into Photoshop and designed an insert, and found a font similar to the font for "Cheers". Goodness knows where the verse came from, but I must have read it somewhere, as it popped into my head. I added a glass from my files and coloured it half full. A simple frame around the glass and sentiment, as I thought the front was busy enough and may have been overkill if I added the dp inside.
stamps - Polkadoodles,
 image - Celebration time
corners - Stamp Soup Rainbows
Distress inks - dried marigold, mermaid lagoon,candied apple,
crushed olive,tattered rose, tea dye 
digital paper - Nibble Skribbles Celebrate papers 2014 


22 May 2023

Colour swatch trial

 Hi Everyone, I saw a swatch of colours recently, while browsing things on Google, that I wouldn't have put together, so this card is how I used them. I had had a voucher given me, from a blog friend, as I think I have said previously, to buy some stamps, so I used them here, VERY simply, just really to try the colour combination. I used them direct to card. 

I stamped the frame, using 2 stamps and added the sentiment into each corner, then coloured them. I added the flowers, I don't know why I added a small one in the centre, but it's done now. I had an unexpected birthday card to send, so sent I this one, after stamping the large flower inside and colouring it, with a simple stamped verse. It wasn't until I posted it that I realised I hadn't taken a photo of the insert. OH! Well, the swatch was interesting and I may use it again.

stamps - Polkadoodles, DaisyDays
Distress Inks - scattered straw, dried marigold, soft water taffy, frayed burlap. 


18 May 2023

Garden mid month WLSC

 Hi Everyone, my DT card today is for We Love Stamping 
the theme this month being "Anything stamped/option Stamped, In the Garden "

 
The garden theme is so wonderful, with lots of subjects  and images to choose from, but I have chosen flowers this time. 

I decided that, as I always add pot hyacinths to the garden, I would use this lovely stamp, which I had a long time ago, and was unused. I added matching paper from a pad, for the "lawn & border" and brown card for the "earth". Laying them side by side. 
 
The hyacinths were stamped using a mask on the bottom, to set them into the "soil", they were coloured with DI's. I stamped 2 sentiments and die cut the matching label die. I glued them together and "planted" them in the border. Adding the die cut sentiment and stamped birthday onto matching card.
 
Hyacinth, Just for You, &  birthday stamps - Magazine freebie
Distress Inks - dusty concord, wilted violet, peeled paint, forest moss
 Happy die - Magazine freebie
paper - Craft Sensations
purple card - Crafters Companions

15 May 2023

BIG birthday

 Hi everyone, I saw a card on a blogger's post and just had to case it, I thought a marvellous design for one of our GNephews, whose birthday it is this week. I went into my Silhouette and cut the letters using a snippet of card from a paper pad and layered it onto navy card. I thought it needed something, so I die cut a candle and added it to the "I". Then I used gold glitter pen and coloured the flame with it. A nice quick card for a change and also in the post, before I knew it. The wonderful card I cased, can be found here. Thank you Karren.

font - Stencil
card - Craft Sensations
die - I think it's a Cut and Make mini die
Silhouette


11 May 2023

First birthday

 Hi Everyone, I hope you are all well.

My card is for our Great, Great Niece, who is one today. She is a little darling I have been told, she lives many hours from us, so although I have nearly daily updates of her from my Niece, whose granddaughter she is, we haven't seen her in "real" life. Little Iris has been spoiled by her sister and brother, which has meant she has only just begin to crawl. 

Anyhow, here is the card, that's what you're here for, not my family ramblings!

I had real trouble putting this together with one thing and another, but eventually this is what was made. I used ready coloured images that I have had for years. (I'm going back and using a lot of older images etc of late and quite enjoying using them all again.) I designed the page using the images in Photoshop, adding digi paper to the 1, then took them all into Silhouette, where I added more images and print and cut the card shape and extra images, to layer. There are 3 layers of each bunny and one in reverse, so I could add it to the back of the hiding bunny. I added glaze to the noses and added a fine line black pen to accentuate the eyes. All sounds so simple, but it took me a day and a half to make.

I added more balloons to the bunny in Photoshop for the insert and print and cut it to shape for the card. the sentiment can be read clearly, just doesn't show well here. 
If you look bottom left, you can just see the reverse bunny.


07 May 2023

Garden WLSC

 Hi Everyone, my second DT card today is for We Love Stamping 
the theme this month being "Anything stamped/option Stamped, In the Garden "

 
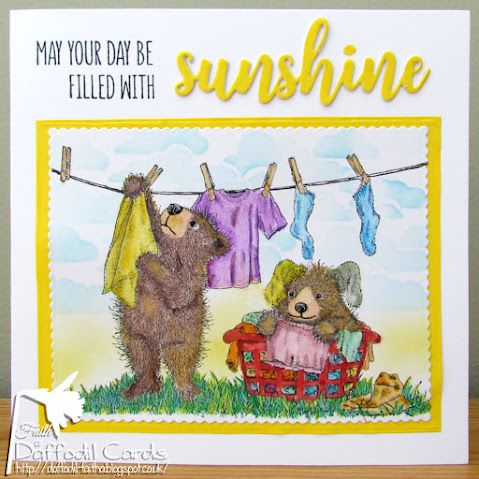
My card today is, for me, definitely "In The Garden". Because I have no greater joy than seeing the washing on the line, in the garden. When my son was a baby, I loved the nappies, (diapers) blowing in the wind, on the line, and I took photos of them. Where the photos are now, goodness knows, but they are still flying in the wind, in my memory. Sad, aren't I? As for the sentiment, you want sunshine on a washing day, don't you?

image - Stampendous, Laundry Line, House Mouse
inks - Distress Inks - lots
sunshine die & sentiment stamp - Crafters Companion Sunshine collection
rectangle die - Tonic
yellow card - Lidl
cloud stencil - Funky Fossil 
 
There are beautiful prizes to be had for the Winner.
 
 
Craft Stash Lisa Horton Viola embossing fold, die and stencil collection 
 

Flowers CHC


 Hi Everyone, my DT card today is for,
 
  The theme for this month is "Flowers"

I bought the Daisy die, a few months ago, but haven't used it until now. The theme is flowers, so I decided on the design, then cut the daisy. Only to find the centre petals cut out, which I didn't want, so I embossed the die, coloured it, cut it out and added the die cut on top, attaching it by the centre only.

Off to find some daisy digital paper in my files and found this one, cutting it to fit the bottom half of the card. I then decided to use ribbon, as I hadn't used any in a long while, and it matched the ink of the leaves. I attached the ribbon to the paper and then to the card.

A birthday sentiment was stamped onto the paper, decided it needed more, so drew a wiggly line and a few strokes. Card done!
die - "Charming Daisy" Crafters Companion
ink - Distress Oxide, squeezed lemonade, fossilized amber, & mowed lawn
sentiment - magazine freebie
dp - "Daisy Fairy" Carin Grobe
ribbon - stash


03 May 2023

Doggone it TMR

 Hi Everyone, my DT card today is for 

 
 I forgot a birthday recently, so thought I had better get a card ready just in case I do it again. As usual, I went through my files to find an animal that I could do my DT post and send a card, in one. Thankfully, I found this goofy dog.
 
I printed him out with a sentiment that I thought matched. They were both fussy cut twice for layering, you know I hate fussy cutting, it was only because I printed them wrong, and my Silhouette wouldn't recognise them! Luckily, they were a "simple" cut.
 
The dog and sentiment were coloured with DI's. I decided to add wobbly eyes, to make him even more goofy, and added glaze to the collar, nose, tongue, and bone. The sentiment font, "freshstart" I decided, was fun to match.

A leftover strip of card from another project was placed behind him. I loosely followed this sketch -

image - Elizabeth Dulemba
inks - Distress Inks, tea dye, walnut stain, gathered twigs, worn lipstick, 
hickory smoke, lost shadows, fired brick.
glaze - Nuvo Crystal Glaze
paper strip - Craft Sensation paper pad
eyes - stash

01 May 2023

Rabbits CCC

 Hi Everyone, my DT card today is for -

Critter Crazy

Whether Furry, Feathered, Fantasy, Fairytale, 
Scaly, or Insect, there must be a critter...

Looking through my stamps, I came across these fab little bunnies, that I also used for an Easter card. I looked through some sketches I keep, and came across this one that I thought would be a change in direction for me. I die cut 3 squares and stamped the bunnies, and the sentiment, with a flower each side of it. The bunnies were then coloured with DI's. The strip was embossed and all attached to the main card.  Definitely a CAS card. 
stamps - Violet Studio
inks - Distress Inks, hickory, smoke, tea dye, ripe persimmon
dies - Tonic pin dot
linen card - Crafters Companion
embossing folder - Cart-US
sketch - FMS 229