Hi Everyone, My computer is about to die!
I am letting you know I may or may not be posting for a while, only my scheduled posts will go ahead, I have trouble starting my 'puter and my son has been starting it in "Safe Mode" to get it going for me, looks like I will HAVE to have a new one. UGH! I could do without the expense, but what would I do without it? There are a couple of progressive challenges I would like to carry on with so will try and post them, otherwise I will "see" you when I can.
Anyhow, I will be spasmodic in posts and comments, as I am spending HOURS and HOURS backing up, changing me emails subscriptions, (as I didn't have an on line email address). My son has found one he would like me to have, but!!!! it costs a bit more than I would have liked. We'll see if they can bring it down somewhat. I never thought I would say it, but I am getting sick of sitting in front of this screen and me a 'puter lover! Just hope I can get it started tomorrow and at least until I get all my work done first. Keep your fingers crossed
Have a GREAT weekend
12 June 2015
10 June 2015
Ladybird / Ladybug
Hi Everyone, my second DT post for Deedee's Digis today, Deedee is sponsoring a challenge at Sweet Sketch Wednesday 2 and we had this great sketch to work with. I have been waiting to use this wonderful Ladybird (as we call her in the UK) image, it is the cutest isn't it? I used the outline image and coloured her to match the DP's I decided to use. I also used this kit Here who would have guessed they are from the same kit?
After watching a few TV craft shows about dies and them saying to look how else they could be used. I decided to take a "border" die and cut it up. I used one of the patterns in each corner and used 3 patterns to link them. I am pleased with the effect around the card and will now look at the other dies I have and, NOT used - hang head in shame! to see what else I can come up with. Keep a look out LOL.
The sketch was copied into Photoshop and I laid out my DP's as per the sketch. I added a double copy of the flower that the Ladybird holds, enlarging it slightly to add to the corner as per the sketch. I found a Ladybird "button" in my files and copied it 3 times, and some Ladybird scatters and added them to the main image. After printing it all, I cut them out and layered on top of the die cut edge with some ribbon from my stash. Added Stickles and 3D gloss.


Ladybug Deedee's Digis
Sketch 2-57 Sweet Sketch Wednesday 2
DP's Karen Lewis "Hello Sunshine" freebie kit
Ladybug line by Kristin Aagard "Buggin Out" kit.
Die Spellbinders "Morrocan Accents"
Cuttlebug "Swiss Dots" embossing folder
http://disdigidesignschallenge.blogspot.co.uk/2015/06/use-die-cuts.html Use Die cuts
http://simplypapercraftsforalloccassions.blogspot.co.uk/2015/06/challenge-6.html Anything Goes
Life's a Beach!
Hello Everyone, a DT post today for Deedee's Digis a sponsored challenge at Crafty Gals Corner Challenge the theme is "The Great Outdoors".
My outdoors today is the beach and this fabulous image from the "Life's a Beach" kit by Deedee's Digis. I like to take the outline images from the kits, so that I can colour to match any DP's I use, that's the wonder of Deedee's kits, you have so much choice to use the ready coloured image or as I do (most of the time) use the outline images and colour them yourself.
Anyhow on to my card. I used the piggy in the "rubber ring" as it was to us, shows my age doesn't it LOL. The sentiment is also from the kit, great - no looking for something to match.
All designed in PS - of course LOL. I printed the layers and layered onto black card. Added some Stickles and 3D gloss.
I used a cut file to make the ice cream cone, yep! even the cherry is included. I used the solid image included in the file, as I was cutting such a small cone, like a button.


You can find the (choice of 2) Ice Cream Cut file by Shirley's Cards
DP's Amanda Wittenborn Aloha kit.
07 June 2015
Purrfect! 50th birthday
Hi Everyone, I though I would give you an update of my Son's health scare before showing you my card of today. The update is, he was given 100mg tablets to be given twice a day in February, he has control of his medicines and after another less severe incident on Thursday we spoke about them as his blood test in hospital had shown a high raised level. It seems he has been given 200mg by the Pharmacy and instructions 1 twice a day, he hadn't realised and so has been taking a double dose, for how long we don't know. The Pharmacy hadn't informed us of the change, I rang the GP and he arranged for my son to have a blood test before taking any more of the tablets. He still isn't that well, but at least we know the reason, hopefully. The lesson learned, ALWAYS read the dosage and instructions on your medicines and don't assume you are having the same as always.
On to my card for today. I wanted a 50th birthday card for a friend, it had to have a cat on it. I came up with this. As it is lilac season, (ours are still in bloom - just!) I used paper and lilacs from a digi kit and made a corner from them and other elements in the kit. The cat is one I had in a blog train in 2013, I've never used it, it is a perfect match methinks!.
I designed and laid out the the different elements in Photoshop using Garamond Italic font that, I thought, matched the cat's tail. I altered the colour of the cat just a shade or two to match the paper. I printed the front out and saved the corner layout and the cat with an extra head! as a PNG file and sent it to my Silhouette, have I told you I LOVE the Print and Cut feature. I then did the inside to match the outside. The recipient has an aversion / phobia to glitter so I couldn't add any, but I think the colours don't really need any. Quite simple, but I love those lilacs and the cat.


Booland Designs "Sentiment"


04 June 2015
Watercolour Vellum
Hi Everyone, sorry to have been AWOL, my son had a disturbing reaction to his prescription tablets, he's been on them since February, but it seems they have built up in his system, he collapsed Monday morning, unable to stand or speak, he couldn't see properly and was vomiting, to cut a long story short, he is home and apart from slight stomach problems he is now OK, after being told that he has to reduce the tablets from 200mg to 100mg. It has been a really worrying time. However thankfully all over - this time! I just hope he will have regular blood tests now. If not I'm going to have to do some shouting! The NHS is wonderful and I couldn't fault the care he had, but sometimes it can fall on it's face. I'm thinking that he should be having regular blood tests due to the amount of prescription medicines he is on. It's not often I shout out about what is happening at home, but I have been so worried and so very tired of all the incidents we have to go through. I just had to share my burden - Sorry.
Oh! well lets get on to the reason you are here. The Outlawz has a progressive challenge and my offering today is a mix of digital and water colouring, Yep! I have made a couple of cards with my water colouring AND on vellum AND wet and dry embossing. AND I quite like them too. LOL They are Poppies so are suitable for 2 sympathy cards I had to do today for friends who have lost their Father's.
The first I did was digitally colour on printable vellum. As it came out of the printer I noticed there was a lot of ink, I quickly found some clear embossing powder and embossed it all. I like the shine it gives to the sentiment and frame as well as the poppies.
I was lucky to win prize candy from Cindy recently and it came in the post yesterday, in with a mass of other lovely things, was an embossing folder, which I used to emboss the background card and the top of the vellum, (trying to match it up). Layered it with black paper, wrapped a ribbon around it and added it to the card. I did the same with the others, but used watercolour pencils on the back of the vellum. The vellum is only attached at the top, the wind wouldn't stop so they are shown flapping!
The first card is digitally coloured in PS the others are the watercolour cards.
 |
| http://outlawzchallenges.ning.com/group/freebie-progressive-challenge/forum/topics/progressive-freebie-challenge-june-1st-2015 |
01 June 2015
Easel card
Hi Everyone, something I do very rarely is an easel card, but I decided to incorporate 2 challenges in one. Outlawz Wednesday Sketch Challenges where I got the sketch and another, but I missed it by a couple of hours duh!
Anyhow onto my card, I laid it all out and coloured the image in PS. I cut it all out and layered it onto the card blank. I added 3D gloss to the bouquet flowers and Stickles to the butterflies. The photo isn't too good, blame the weather LOL.

Image Tiddly Inks
Papers Snickerdoodles
Butterflies A J Roberts
Sentiment Create with TLC
Anyhow onto my card, I laid it all out and coloured the image in PS. I cut it all out and layered it onto the card blank. I added 3D gloss to the bouquet flowers and Stickles to the butterflies. The photo isn't too good, blame the weather LOL.
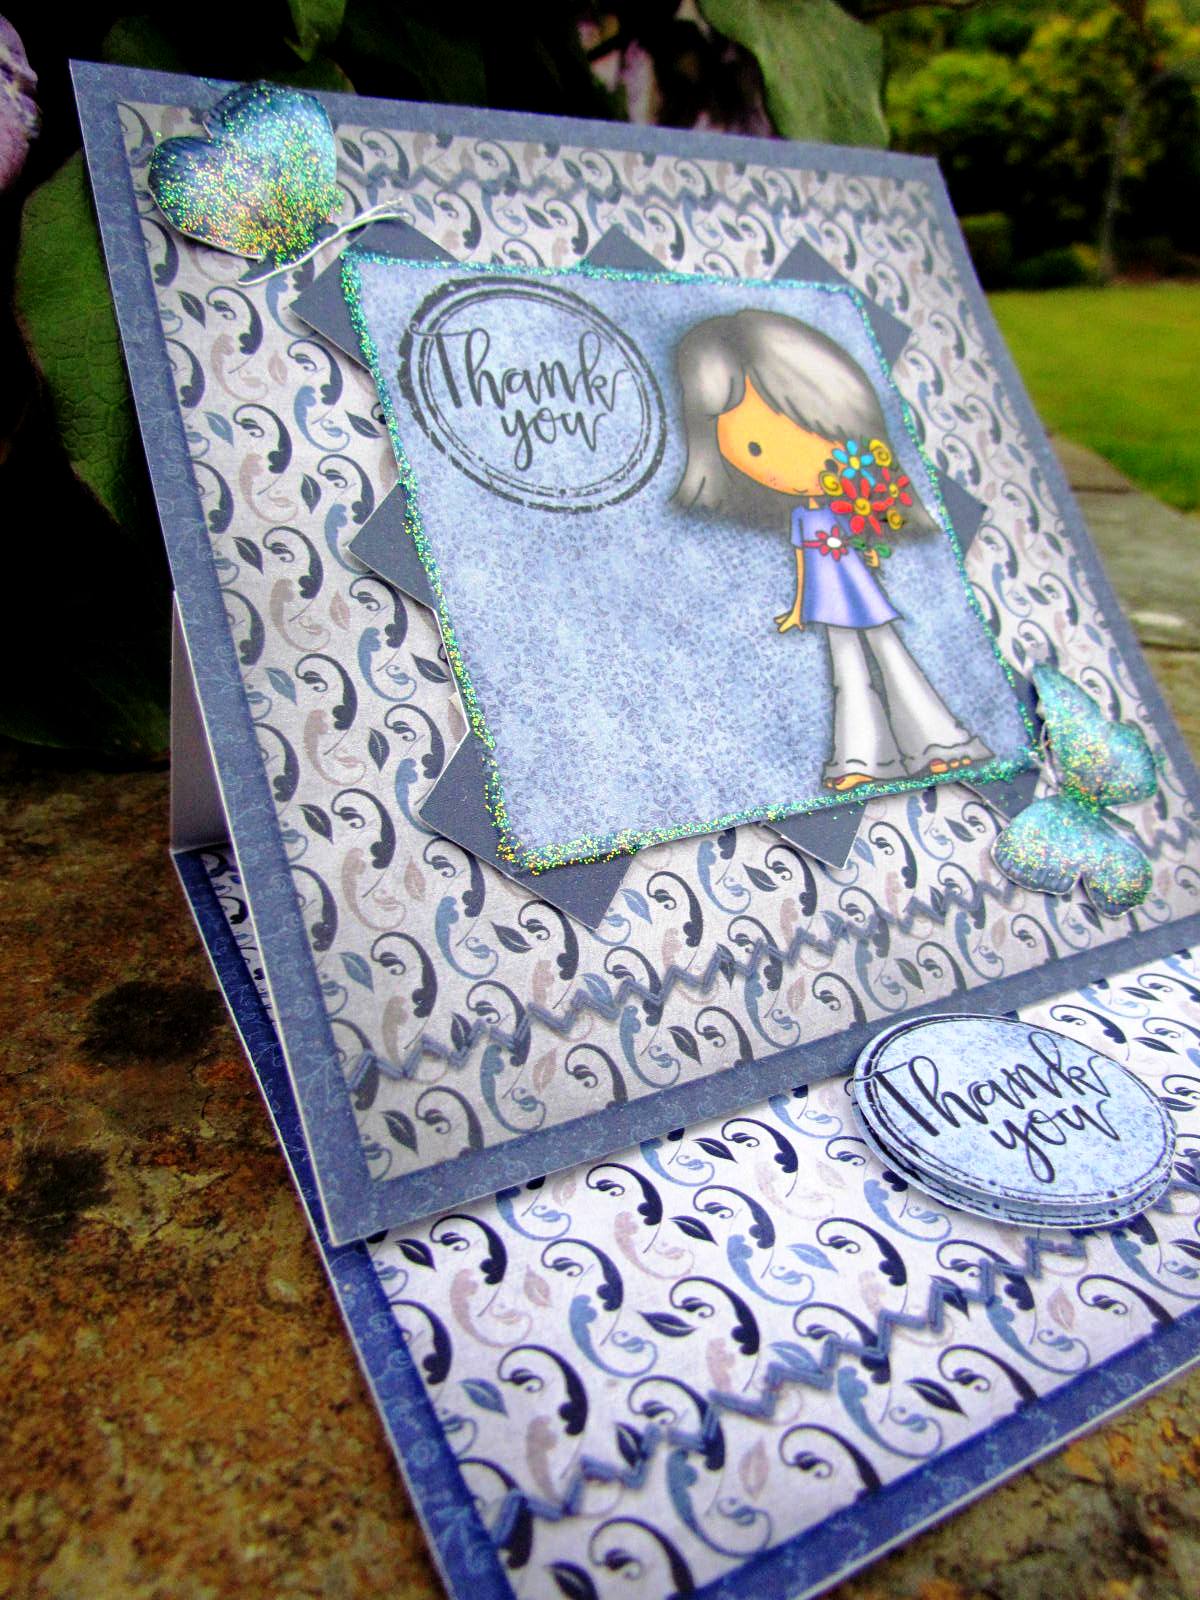

Image Tiddly Inks
Papers Snickerdoodles
Butterflies A J Roberts
Sentiment Create with TLC
A cuppa!
Hi Everyone, a DT post today brings me to an image that fills me with joy - yep! a cuppa! LOL. Deedee's Digis is sponsoring a challenge at House of Cards blog hop and they have supplied the inspirational photo. My card reflects the shelves, the boxes and the frames and of course the colours. I hope you think so too.
I used Deedeee's Coffee Cup Greetings and the ready coloured images in the kit. I just added a Tattered Lace die, cut from the same striped paper. I laid everything out in Photoshop and printed just what I wanted, I layered them onto the card, arranged the die cuts and 3D'd the flower frame and the lower cups, I added Stickles to the flower and 3D gloss to the cup.
Just in case you wonder how. In PS I made a template 6 inches x 12 inches the open size of the card, then arranged the papers and images, (copying the sketch, which has been reversed), on the right side of the template, when I was happy with it all, I spread the papers and images over the whole 6 x 12 and send to print on an A4, it just needs cutting out and placing onto the card.


 |
| This is the way I laid it out for printing, it is fitted to a 6x6 card, but printed on an A4 sheet of paper. If you would like it, you are welcome to contact me and I'll send you the jpeg, ready to print. |
Subscribe to:
Posts (Atom)